This week I tried a new recipe for chocolate pudding by Melissa Clark that was featured in the New York Times. The recipe I worked out earlier with Choco Perfection was very tasty, but every time I made it I enjoyed it so much I ate a big bowl full, and the next thing you know I was suffering from horribly uncomfortable bloating. Not worth it! So I decided to figure out how to cut down the sugar and carbohydrate for this new recipe. Immediate score! Deep, dark, luscious, rich, tasty - a cross between mousse and the best pudding you've ever had .... and no tummy issues!
Dark Chocolate Pudding
Group I
2 TB butter
1 tsp vanilla extract
6 oz 85% or higher chocolate, chopped
Group II
2 1/2 cups whole milk
1/2 cup heavy cream
1/3 cup xylitol or Swerve
1/2 tsp stevia extract powder
2 TB coconut palm sugar
2 TB unsweetened cocoa powder
2 TB cornstarch
1/4 tsp salt
Group III
2 large eggs
Equipment: an immersion blender or food processor
1. If using an immersion blender, put all of the ingredients from group I into the bain marie or heatproof bowl. If using a food processor, place in the bowl of the food processor.
2. In a large saucepan, combine all of the ingredients from Group I and whisk to combine. Over medium heat, bring the mixture to a low boil, whisking frequently. Continue to boil for 1-2 minutes; overcooking causes the cornstarch to stop working.
3. Meanwhile, crack the two eggs into the heat-proof measuring cup from the milk; beat lightly with a fork.
4. Pour a small quantity of the hot milk mixture into the eggs and whisk with the fork to keep the eggs from curdling. Add more hot milk mixture and whisk again. Now pour the egg mixture back into the hot milk mixture and whisk into the whole. Put the heat back on under the pan, and bring it just to the boil again.
5. Remove the mixture from the heat and pour over the chocolate, butter and vanilla. Process until smooth. (The hot milk will melt the chocolate.)
6. If in the bain marie or heatproof bowl, let cool to room temperature, then chill. If using the food processor, pour into ramekins, small bowls, or a large heatproof bowl and chill.
Serve with optional whipped cream, lightly sweetened creme fraiche, and/or chocolate shavings.
Showing posts with label stevia. Show all posts
Saturday, January 16, 2016
Tuesday, March 10, 2015
New: Sugar-Free Banana Bread
Even after I have created a new recipe and found it delicious, I continue to tweak it; I work on lowering the carbohydrates and raising the deliciousness. And frankly, sometimes I lose confidence in ingredients that I was fond of; soy - not so thrilled with how it's raised. These days, I'm pretty excited about working with coconut flour. It is low in carbs, very high in fiber and protein, and has a fine crumb and a lovely sweet base flavor, perfect for cakes and cookies. However, all that fiber tends to suck up the liquid, and creates a strong drying effect. This is where a fruit quick bread is the perfect pairing; the moisture in the fruit binds with the coconut fiber. This, plus the addition of almond meal and additional eggs creates a moist, flavorful loaf. In this case, the new formula is so much more delicious than the old, I decided to do a new posting. One word of warning: the lower the wheat content, the lower the gluten. The lower the gluten, the lower the crown. This recipe is completely delicious, but it has a lower profile than you might be used to!
Group 1
4 small, very ripe bananas, or 3 large, mashed
3 large eggs
1/3 cup erythritol
2 TB xylitol
1/4 tsp stevia extract powder
1 TB coconut palm sugar (optional, but delicious - for flavor)
1 tsp pure vanilla extract
OR:
2/3 cup xylitol or Swerve
1 TB coconut palm sugar
1/4-1/2 tsp stevia extract powder
Group 2
1/2 cup whole wheat pastry flour
1/2 cup coconut flour
1/4 cup almond meal
2 TB flax meal
1 tsp salt
1 tsp baking soda
Group 3
1/2 cup walnuts, broken into medium pieces
1. Preheat oven to 350 F. Grease loaf pan. (Gotta love spray-on coconut oil!)
2. Combine mashed bananas, eggs, sweeteners and vanilla in a large bowl and stir well to combine.
3. In a medium bowl, combine flours, salt and leavening. Whisk to combine, carefully breaking up any lumps of meal or flour. (Coconut flour does have a tendency to lump.)
4. Stir flour mixture into banana mixture. Stir until all lumps and dry spots are well incorporated.
5. Stir in walnuts until well distributed.
6. Scoop batter into greased loaf pan and smooth top.
7. Place pan on middle rack of preheated oven. Bake until toothpick inserted in center comes out clean, around 50 minutes to 1 hour.
8. Cool on rack until cool enough to tip out of pan. Cool completely on rack out of pan.
Sunday, August 31, 2014
Sugar-Free, Low-Glycemic Pecan Pie
My daughter requested a pecan pie as a special reward for all of the hard work she'd been doing for school. I have a recipe from Cook's Illustrated which calls for maple syrup instead of corn syrup - super delicious! And having made it for her, once again I found myself feeling a little sad about how I was never going to get to eat that delicious item again.... or was I?
I started thinking about yacon syrup, a nutritious, super low-glycemic syrup made from a South American tuber. Yacon syrup has been shown to have amazing properties as a product for folks with diabetes and metabolic disorders. I've been eating it in the divine chocolates created by Coracao Confections for several years now, and it has recently become the darling of Dr. Oz. Yacon syrup is dark, thick, sweet, but at the same time tangy. It reminds me a bit of maple syrup, but even more so of tamarind. I decided that it could be the perfect substitute for corn syrup or maple syrup in a pecan pie. But first I had to get my hands on some... I have yet to see it on grocer's shelves - even health food stores. My friends at Coracao turned me on to Raw Food World, which they have been doing business with for some time. That took care of that issue, and it was on to recipe creation.
You know, sometimes when I try a recipe the first time, it's just a complete fail. Sometimes it needs some tweaking. And sometimes, rarely, it's fantastic the very first time. That's the story with this pie, my friends. Go forth and enjoy the yumminess once more!
Sugar-Free, Low-Glycemic Pecan Pie
1 batch of whole grain Foodier Than Thou pie crust and a 9" regular (shallow) pie dish OR
1 batch of Foodier Than Thou almond meal crust (skip the almond extract) and a tart pan
1/4 cup coconut palm sugar OR an additional 1/4 cup of sugar substitute
1/4 cup of your favorite sugar substitute: Swerve, Lakanto, Splenda OR erythritol
1-2 tsp stevia powder - to taste. (You may want the higher amount if you use erythritol, which is less sweet than the other sweeteners.)
1 cup yacon syrup
1/2 cup heavy cream
4 TB unsalted butter, cut into 1/2" pieces
1/2 tsp salt
6 large egg yolks, lightly beaten
1 1/2 cups toasted, chopped pecans or walnuts
1. Preheat the oven to 450 F.
2. In a heavy saucepan, combine the sugar, sugar substitutes and stevia powder until well combined. Add the yacon syrup and heavy cream, place over medium heat, and stir occasionally, until the solids have dissolved, about 5 minutes.
3. Remove from heat and let mixture cool for 5 minutes. Add the butter and salt and whisk until incorporated. Then whisk in egg yolks until well incorporated.
4. Put pie crust into pan and crimp the edges. If using the almond meal crust in a tart pan, press the crust well into the pan with your hands and/or a wooden spoon. If using the almond meal crust and tart pan, you will have some extra crust and filling. If so, use them to make some small ramekins of pie.
5. Sprinkle the chopped, toasted nuts into the bottom of the crust. Carefully pour the liquid filling over the top. Use a rubber spatula to get all of the yummy stuff into the pan.
6. Carefully place the pie onto a baking sheet and place on the central rack of the hot oven, and immediately reduce the temperature to 325 F. Bake until the filling is set and the center jiggles only slightly when the pie is gently shaken, 45-60 minutes.
7. Remove pie from oven and cool on a rack for at least an hour. Then refrigerate until set, at least another hour, and up to one day, or just cool on the rack for several more hours. If you rush to cut it, it will not be solid! (It's hard to resist; believe me, I know!) Bring to room temperature before serving.8. Serve small wedges, with optional Bourbon Whipped Cream - which really adds a lot to the party!
Bourbon Whipped Cream
(Adapted from Cook's Illustrated)
1 cup heavy whipping cream
2 TB bourbon
2 TB coconut palm sugar
1/2 tsp vanilla extract
Combine all ingredients in a bowl and whip until stiff peaks form. Serve with pecan pie. Yum!
Sunday, July 13, 2014
Sugar-Free Stone Fruit Cake
SUGAR-FREE PEACH/APRICOT CAKE
Is this a cake, a tart, a pie.....? Call it what you will, this is the perfect use of all of the apricots, peaches, nectarines, and plums dropping off the trees at this time of year! This delicious recipe is so easy and so good, you may find yourself making it several times in one week. Not being very sweet, it makes a lovely coffee cake, breakfast, snack, or dessert. Try any stone fruit, and if you wish, replace a cup or so of the stone fruit with some fresh blueberries. As always, this recipe is sugar-free, high protein, and low-carbohydrate. Although this is perfect for folks like me who are diabetic or have a metabolic disorder, everybody else loves it, too. Only YOU will know that it's sugar-free!
Preheat the oven to 375 F.
PASTRY
1 1/4 cups almond meal
1/4 cup whole wheat pastry flour
1/4 tsp salt
1 tsp baking powder
1/2 cup Swerve OR 1/4 cup erythritol + 2 TB xylitol + 1/2 tsp stevia powder
6 TB unsalted butter, cut into small pieces
1 tsp almond extract
1 large egg
FILLING
2 1/2 pounds stone fruit, washed, dried, pitted and cut into fourths (apricot, peach, nectarine, or plum)
OR replace 1/2 pound of fruit with 1 cup fresh blueberries
2 TB almond liqueur
1/2 cup Swerve OR 1/4 cup erythritol + 2 TB xylitol + 1/2 tsp stevia powder
1 TB tapioca flour OR 1 TB tapioca quick-cooking tapioca
For the Pastry:
1. Using a food processor, pulse the almond meal, flour, salt, baking powder, and sweeteners until they are just combined. Add the butter and pulse until the mix resembles coarse meal, with some pea-sized butter chunks. Add the egg and almond extract and pulse until it just comes together.
2. Using floured fingers, press the pastry into a spring form pan, flattening with the palm of your hand, and coaxing it up the sides of the pan until it reaches half way up the sides. (You want the pastry to be as least as high as the fruit.)
3. Chill the pan in the refrigerator until firm, at least 15 minutes.
For the Filling:
1. Meanwhile, prepare the fruit. Wash, dry, pit, and cut the fruit into chunks. Add the almond liqueur and stir to combine.
2. In a small bowl, whisk the sweeteners with the tapioca flour thoroughly (available from the bulk section of Berkeley Bowl or in packages from Bob's Red Mill), or, if you are using quick tapioca, whirl the sweeteners with the tapioca in a spice mill until the tapioca becomes a flour.
3. Sprinkle the fruit with the sweetener mix, and stir gently to combine thoroughly. Spoon the fruit mixture evenly into the chilled springform pan. Cover with foil, place on a baking sheet (the butter does tend to leak out the bottom.) and bake, covered, for around 1 hour and 20 minutes, until the crust is golden brown around the edges.
4. Cool, uncovered, on a rack, for at least 1/2 an hour. Carefully remove the sides of the springform and put on a platter. Wait until the cake is thoroughly cooled before serving; the filling will firm as it cools.
![]() | |
| The finished product - golden brown and luscious |
Is this a cake, a tart, a pie.....? Call it what you will, this is the perfect use of all of the apricots, peaches, nectarines, and plums dropping off the trees at this time of year! This delicious recipe is so easy and so good, you may find yourself making it several times in one week. Not being very sweet, it makes a lovely coffee cake, breakfast, snack, or dessert. Try any stone fruit, and if you wish, replace a cup or so of the stone fruit with some fresh blueberries. As always, this recipe is sugar-free, high protein, and low-carbohydrate. Although this is perfect for folks like me who are diabetic or have a metabolic disorder, everybody else loves it, too. Only YOU will know that it's sugar-free!
Preheat the oven to 375 F.
PASTRY
![]() |
| Press the dough firmly and gently up the sides |
1/4 cup whole wheat pastry flour
1/4 tsp salt
1 tsp baking powder
1/2 cup Swerve OR 1/4 cup erythritol + 2 TB xylitol + 1/2 tsp stevia powder
6 TB unsalted butter, cut into small pieces
1 tsp almond extract
1 large egg
![]() |
| Mmmm - super ripe Royal Blenheim apricots from my tree! |
2 1/2 pounds stone fruit, washed, dried, pitted and cut into fourths (apricot, peach, nectarine, or plum)
OR replace 1/2 pound of fruit with 1 cup fresh blueberries
2 TB almond liqueur
1/2 cup Swerve OR 1/4 cup erythritol + 2 TB xylitol + 1/2 tsp stevia powder
1 TB tapioca flour OR 1 TB tapioca quick-cooking tapioca
For the Pastry:
1. Using a food processor, pulse the almond meal, flour, salt, baking powder, and sweeteners until they are just combined. Add the butter and pulse until the mix resembles coarse meal, with some pea-sized butter chunks. Add the egg and almond extract and pulse until it just comes together.
2. Using floured fingers, press the pastry into a spring form pan, flattening with the palm of your hand, and coaxing it up the sides of the pan until it reaches half way up the sides. (You want the pastry to be as least as high as the fruit.)
3. Chill the pan in the refrigerator until firm, at least 15 minutes.
For the Filling:
1. Meanwhile, prepare the fruit. Wash, dry, pit, and cut the fruit into chunks. Add the almond liqueur and stir to combine.
2. In a small bowl, whisk the sweeteners with the tapioca flour thoroughly (available from the bulk section of Berkeley Bowl or in packages from Bob's Red Mill), or, if you are using quick tapioca, whirl the sweeteners with the tapioca in a spice mill until the tapioca becomes a flour.
3. Sprinkle the fruit with the sweetener mix, and stir gently to combine thoroughly. Spoon the fruit mixture evenly into the chilled springform pan. Cover with foil, place on a baking sheet (the butter does tend to leak out the bottom.) and bake, covered, for around 1 hour and 20 minutes, until the crust is golden brown around the edges.
![]() | |
| The filling should come just below the pastry line |
4. Cool, uncovered, on a rack, for at least 1/2 an hour. Carefully remove the sides of the springform and put on a platter. Wait until the cake is thoroughly cooled before serving; the filling will firm as it cools.
Labels:
almond meal,
apricot,
cake,
cobbler,
delicious,
diabetic,
erythritol,
high protein,
low carbohydrate,
low glycemic,
low sugar,
low-carb,
low-carbohydrate,
nectarine,
peach,
pie,
stevia,
sugar-free,
Swerve,
tart
Friday, April 11, 2014
Creamy, Delicious, Low-Carb Cheesecake
For some time I have been enjoying the delicious, low-carb "breakfast" cheesecake I invented a while back; it's very yummy, and nice and easy to make. However, I really was missing the delightful contrast in texture and flavor you get from a classic graham cracker crumb crust cheesecake. For the life of me I couldn't think how to make something that would work.... make low carb, sugar free graham crackers, just so that I could make crumbs out of them? That didn't seem like a good idea. What to do, what to do?
I recently had a flash of inspiration..... what if I used almond meal, just straight up almond meal, but toasted it in a saute pan? Immediate smash hit!
This is so yummy, and really straight-forward and easy. You may have a little leftover "crumbs"; if so, they store well in the fridge for your next batch - which I predict you will be making very soon! However, they are quite tasty sprinkled on the top of the cheesecake, or even eaten straight up with a spoon.
PREHEAT OVEN TO 325 F
ALMOND MEAL "GRAHAM CRACKER" CRUST
| almond meal before toasting |
2 cups whole almond meal (I use Trader Joe's)
1 teaspoon stevia extract powder
1 tablespoon xylitol
2 tablespoons erythritol
1 tablespoon coconut palm sugar
1/4 tsp salt
2 tablespoons unsalted butter
2 tablespoons coconut oil
In a small bowl, whisk the sweeteners until well combined.
In a medium-sized skillet, toast the almond meal, stirring frequently to prevent scorching. When the almond meal is just lightly golden and fragrant, remove it from the heat. Be careful not to overcook the almond meal - it will continue to darken and toast in the hot pan even after you have removed it from the heat.
Whisk the sweeteners into the toasted almond meal until well-combined.
| Finished Crust |
CHEESECAKE FILLING
2 cups full-fat cottage cheese (full fat is the lowest in carbs)
1 cup full-fat cream cheese (lowest in carbs)
1/2 cup full-fat Greek yoghurt (lowest in carbs)
2 tsp pure vanilla extract
3 large eggs
1 tsp stevia
1 tablespoons xylitol
2 tablespoons erythritol
3 tablespoons coconut palm sugar
Bring all of the ingredients to room temperature.
In a small bowl, whisk together the sweeteners until well-combined.
Using an immersion blender, blender or food processor, process the cottage cheese until smooth. Add the cream cheese, yoghurt and vanilla and process until smooth. Add the eggs and sweeteners and process until smooth.
PUT THEM ALL TOGETHER
Using your ramekin collection, put 2-4 tablespoons of the "graham cracker crust" mix in the bottom of each cup, depending on the size of the vessel and your taste. Press the crumbs down using the back of a spoon.
Spoon the filling on top of the crumb crust. The number of ramekins you make depends on the size of the ramekin and how much of the crumb mixture is in it.
When you have used all of the filling up, put them into a large roasting pan, and carefully pour boiling water all around them.
Place into your pre-heated, 325 F oven and bake until firm, around 45 minutes to 1 hour.
Devour!
Tuesday, July 10, 2012
Sugar-Free Plum Butter
![]() |
| Plum Tree at our Community Garden |
It's early July, and plums are dropping like sticky rain all over Berkeley. From the tiny maroon fruits that blend into the leaves on the street trees, to the teeny bright red ones landing in the back yards, the full-sized purple and deep red ones, everyone with a plum tree has more than they can possibly manage.
Our neighbors Lisa and Brooks put out the call: come pick some plums - please! Naturally I hustled right on over, not having any idea what kind of plums were on offer. If they were large, I was thinking of galette or German pflaumenkuchen, if small, plum butter. When I arrived, I found tiny ruby fruits covering a gigantic tree in their back yard, plonking all over the patio and grass, squishing under foot. Plum butter, here we come! Good thing I bought some more canning jars.....
When the fruits are small, there is no need to do anything to them but rinse and drain them, sort out any rotten ones, and put them on the stove to cook with a little lemon juice and some calcium water. You can filter out the pits and skins later using a food mill. If you don't have a food mill (I don't) a colander and a big pestle, wooden spoon or muddling stick will do just fine.
There are several flavor directions you can go in with plums to enhance their flavor; this recipe uses vanilla, which rounds out the flavor beautifully. I have also seen recipes calling for a piece of cinnamon stick instead, which sounds very good. I wonder about star anise......
This recipe is completely, utterly delicious. I wonder if Lisa and Brooks have some more plums to spare....
Sugar-Free Plum Butter
6 pounds plums
2 vanilla beans, split OR 2 tsp vanilla
1/3 cup lemon juice (I used Meyer variety)
4 TB calcium water
2 TB low-sugar pectin
2 3/4 cups erythritol
1 1/3 cups + 2 TB xylitol
1 tsp stevia extract powder
1 tsp unsalted butter
If the jars are brand new, wash them and the rings and lids to remove any chemicals left from processing. If they have been sitting in the basement, check them for dust, and wash off any you find. Put the jars and rings into a very large stockpot or canning pot and fill with hot water to cover by an inch or two. Put them on the rear burner of the stove over high heat and bring them to a boil. When they come to a boil, turn the heat down to a simmer and keep them hot and ready.
Following the instructions in your low sugar pectin kit, make calcium water. (I use Pomona brand.)
Prepare the fruit: wash and dry the plums. If large, cut in quarters and remove the pits. If small, put the whole fruits in an 8 quart, heavy stock pot, along with the calcium water and the lemon juice. If using vanilla beans, cut them in half lengthwise and add them to the pot. Put it on the stove and cook over medium heat, stirring occasionally, until the fruit is completely softened, to the point of puree.
While the fruit cooks, measure the sweeteners into a medium-sized bowl. Add the pectin to the sweeteners and whisk them all well to combine.
![]() |
| My antique pestle works great! |
![]() |
| Here it is after removing the pits and skin. |
Put the filtered puree back in the stock pot and bring it back to a full, rolling boil over medium-high heat. When it is ready, get a long-handled wooden spoon ready,
and
gradually add the sweetener mix to the hot fruit, stirring constantly as
you pour in the sweeteners. Stir well and frequently to dissolve the
pectin and the sweeteners with the fruit and to prevent lumping. Add
the vanilla extract and the butter. (The butter is optional, but keeps
the foam in check.) Bring
it back to a full boil, stirring frequently to prevent scorching.
Taste and adjust sweetness as necessary. Turn off the heat. Get ready
to can. (Don't worry if it isn't as thick as jam;
it thickens as it cools.)
Clear a good sized work surface near the stove, and cover it with clean dishtowels (preferably ones you don't care about!)
Turn the heat off under the pot of jars and move it to the front of the stove so you can reach them easily, and move the jam to the back of the stove so you don't get water into it by accident. (Put the lid on the pot of jam if necessary.) Using tongs or a jar lifter in your dominant hand, and a clean dishtowel in your other hand, carefully remove the lids and rings and drain them on the towels on your work surface. Lift each jar out of the hot water, dump the hot water back into the pot, and carefully guide and transport the hot jar over to the work table, using the towel in your non-dominant hand to support the jars until you get it safely to its destination. Turn it upside down to drain out the extra water. Repeat until all of the jars are drained and ready. Scald your best ladle and wide-mouthed funnel in the boiling water and have them ready with your jars.
Turn the heat back on medium high underneath the pot of water and bring it back to a full boil while you jar the jam.
Now, again using your tongs (or a clean towel, oven mitts, or tough hands!) turn the jars right side up, and line them up to be ready to fill. If you have a wide-mouthed jar funnel (which I so highly recommend - available at any good hardware store, Bed Bath and Beyond, well stocked grocery stores, etc., for less than $5) put it on top of one of the jars.
Grab your best ladle, and bring the pot of hot jam over to your work surface. Carefully fill each jar, leaving 1/4" of space at the top. If you have a wide-mouthed funnel, the bottom should come to just the right spot. If you don't, do your best! If necessary, spoon some out to reach the right level. After you have filled all your jars, use a clean, moist towel to wipe the ring area and the top surface of the jars clean. Again, if you have a wide-mouthed funnel, you are much less likely to spill the jam onto the jars and need to clean them. If you have less than a full jar of jam, put that one straight into use and don't bother to can it.
Put the lids on, followed by the screw tops, and screw them down.
When the water bath comes back to a full boil, reduce the heat to low, and again using your tongs, carefully lower the jars back in one at a time. (The shock of the boiling water can break the jar, which is a big messy bummer.) Boil them all for 10 full minutes, then remove them with your tongs, using the same tong/towel technique described above, and let them cool on the toweled work area. If necessary, work in batches.
Notes from Christine:
* Why the range of xylitol quantities? The fruit varies widely in how sweet it is; if you have sweet fruit, use the lower amount, if tart, use the higher. You can always start with the smaller amount and add more if it needs it, but you can't subtract it once it's in!
"What's with all of these obscure sweeteners?" Erythritol and Xylitol are sugar alcohols; super low-glycemic, super low-calorie, super low-carbohydrate, and good for your teeth.
Xylitol is low in carbohydrates and is about as sweet as cane sugar. It has a fairly neutral flavor, but a little bright, almost pepperminty quality. It can be found easily at a well-stocked health food store or really good grocery store.
Erythritol has 0 carbohydrates and is very neutral in flavor - yay! But it is about 60% as sweet as sugar and is very difficult to find in stores, except in individual packets. As it is 60% as sweet as sugar, it takes quite a bit more to reach the right level of sweetness in a recipe, and this makes proportions difficult. However, its very neutral profile - and 0 carbs! make it a natural for blending with xylitol and stevia, especially since stevia is so highly concentrated. It's worth tracking it down by mail-order, or you could make a special request to a grocer to order some for you.
Stevia is a natural, calorie-free leaf extract, super concentrated and very sweet, but with a weird, bitter aftertaste and no volume; due to its highly concentrated state, one teeny-tiny scoopful (which comes in its container) is equal to a teaspoon of sugar. It is easily purchased at Trader Joe's or any grocery store.
Be aware that some Xylitol and Erythritol brands in American packaging are actually imported from China and repackaged. That is why I buy all of these directly from Xylitol USA, http://www.xylitolusa.com/ which manufactures them from North American sources.
Labels:
Atkins,
conserves,
diabetes,
erythritol,
low carb,
low carbohydrate,
low glycemic,
PCOD,
preserves,
stevia,
sugar free,
sugarfree jam,
xylitol
Thursday, June 21, 2012
(Sugar-Free) Fresh Apricot Crostata
![]() |
| Sugar-Free Fresh Apricot Crostata |
Apricot feast or apricot famine! Last year - famine. This year - feast! I went to the farmer's market and bought seconds; ripe, delicious, and cheaper than firsts. First came multiple batches of jam, then a batch of apricot liqueur. I saved all the pits, smashed them open, and put them into some organic Prairie vodka to make almond extract. (The kernel in the pit is a "bitter almond," poisonous to eat, but what almond extract is made from; it's far more almond-y than almonds are!) I was feeling pretty satisfied, the larder was full and I had enough to weather the next famine; no need for more. But.....then my friend Kate scored yet another massive batch of organic apricots at the farmer's market; the first time she scored 25 pounds and hustled to use it all, soliciting recipes from all her friends in the longest Facebook exchange I've ever seen. Then she scored another 36 pounds - yikes! This time she was ready to share some, so we traded; some Artemesia Organic Blood Orange Liqueur for 10 pounds of apricots. The ripest ones needed to be used right away, so I just went straight into jam mode.... there went five pounds. A few more went into the jar of liqueur, with more vodka to cover. And that left me with about 3 more pounds. Hmmmm...... Apricot Crostata!
If you notice any similarity between this and my recipe for sugar-free Linzertorte, you are a clever and observant reader. I changed my recipe for the dough ever so slightly (almond meal only instead of hazelnuts, a little vanilla), and the filling recipe here is essentially a quick jam recipe. In fact, if you don't have any fresh apricots on hand, you can use some sugar-free apricot jam - preferably home-made. Both commercial varieties of sugar-free apricot jam I tried truly had no discernible flavor at all, so if that's all you have available, I would doctor the jam; see below* for instructions.
The recipe would work perfectly with cherries, using exactly the same proportions (I riffed the filling recipe off of a cherry crostata recipe in the Gourmet Cookbook.) If you use cherries, eliminate the almond extract.
Sugar-Free Fresh Apricot Crostata
![]() |
| Time to add the thickener |
Dough
I.
1 3/4 sticks unsalted butter, softened
3 large egg yolks
Finely grated fresh lemon zest from 1 lemon
1 tsp apple sauce
1/2 tsp vanilla
II.
1/4 cup erythritol
3 TB xylitol
6 tiny scoops stevia extract powder (the little measuring spoon in the container)
III.
8 oz/2 fairly packed cups of almond meal
1 1/4 cups whole wheat pastry flour (spoon and sweep measuring*)
1/4 cup + 2 TB soy protein
1/2 tsp salt
Filling
1 3/4 lbs ripe, fresh apricots
3 TB unsalted butter, divided into a few pieces
1/4 cup + 3 TB erythritol
3 TB + 1 1/2 tsp xylitol
6 tiny scoops stevia extract powder
1-2 TB fresh lemon juice (I used Meyer)
2 TB kirsch
1/2 tsp almond extract
3 TB corn or tapioca starch dissolved in 1/4 cup water
Tools: a 10" tart pan with a removable bottom, a mixer
Dough Instructions:
Using your mixer, beat the butter until fluffy. Then add the remaining ingredients from group I and beat until well combined.
Measure all of the sweeteners from group II into a small bowl and whisk to combine. Add to the butter mixture and beat until well combined.
Next, measure all of the ingredients from group III into a medium-sized bowl and whisk to combine. Add gradually to the butter mixture until it is well mixed. Form the dough into two equal balls, place each on its own sheet of waxed paper, and squash into large disks. Put them in the fridge to chill for at least 1/2 hour.
While the dough is chilling, make the filling:
Filling Instructions
Wash, dry, pit and cut the apricots into quarters. (Save the pits to make your own almond extract!)
Add the butter to a 12" saute pan and melt over medium low heat. Add the apricots, lemon juice, kirsch and almond extract and stir to combine. While the apricot mixture cooks over medium heat, measure the sweeteners into a small bowl and whisk to combine. Add the sweeteners to the apricot mixture and stir well. Please note: the sweetener amount is calculated for really sweet, ripe apricots (Blenheims are sooooo delicious!) If your apricots are a little tart and under-ripe, up the sweeteners to taste, and go with the lower amount of lemon juice - perhaps even dropping it; it's there to balance the sweetness. Cook until the apricots have softened somewhat, and released their juices, about 8-10 minutes. Stir up the starch/water slurry to recombine and add it to the apricot mixture. Cook until the whole batch thickens and no longer tastes of corn starch, about 10 minutes more. You will have a delicious, flavorful filling. Let it cool in the pan.
Meanwhile:
Remove the dough from the refrigerator to soften, and pre-heat the oven to 350 F. Put a silpat on a baking sheet, or cover it in foil, and place on the middle rack of the oven to heat.
When the dough is malleable enough to roll, remove one dough disk and set it aside so that you can use both pieces of waxed paper to roll the dough with. (Of course you can use an additional piece of waxed paper, but I like to use as little disposable stuff as possible.) Placing one disk between two pieces of waxed paper, roll until the dough into a 12" round. Put it in the tart pan, and press the dough up the sides of the pan. You can trim off the excess dough or fold it over to reinforce the sides of the tart. Put it back in the refrigerator while you work on the second disk.
Using your two pieces of waxed paper, roll the second disk into another 12" round. Remove the top layer of waxed paper, and cut the round into 10 strips, each one 3/4" -1" wide. Put the whole thing on a baking sheet and put it in the fridge to firm up a bit - this makes it easier to handle - while you do the rest.
Remove the tart pan from the refrigerator, and fill it with the luscious apricot filling. You may have a tablespoon or two left over; don't over-fill the pan - it will overflow and make a sticky mess. This extra filling is the cook's treat while the tart cooks. Well, of course. you could eat it right now, before you go to the next step; I did.
Take your dough strips out of the refrigerator, and being mindful that the outside pieces are the shortest and you will need to repeat the strips going the other way, lay the strips across the tart, either straight to make squares or on the diagonal to make diamonds. You may need to use a spatula to remove the dough strips from the paper. Pinch the outer edges of the dough onto the dough rim in the pan and remove any excess. Repeat going the other way. You will likely have a few small pieces of dough; again, cook's treat. You can eat it raw, or put it on the cookie sheet to bake; it makes a tasty shortbread-like cookie. Just remember to take it out after about 10-12 minutes, or it will burn. (I've done this twice now; phooey.)
Put the tart on the heated cookie sheet in the middle of the oven, and bake for about 45 minutes to an hour, until the crust is golden-brown and the filling is bubbling.
Cool the crostata for at least an hour and a half so that you can safely remove it from the pan and cut it without it breaking.
*Special instructions for doctoring commercially made jam: Take 1 1/3 cups apricot jam. In a medium sized sauce pan, melt the butter, then add the jam and thin it by heating it a bit. Add the almond extract, lemon juice and kirsch in the proportions shown above, and heat and stir to combine. Taste it, adjust the flavors, and follow the directions from there.
GLUTEN-FREE VERSION:
To make this recipe gluten-free, simply substitute your favorite gluten-free baking mix for the whole-wheat pasty flour. All set!
Friday, June 15, 2012
Tangy Sugar-Free Apricot Jam
I never laid eyes on a fresh apricot until I moved to California. For a special treat, we might crack open a can of apricots in heavy syrup after dinner, or get some dried in our Christmas stockings, but fresh? Never. Apricots don't travel well; they really need to be picked when they're super ripe and flavorful, and they won't travel very far that way. This is one fruit you are really best off buying super-ripe, straight from the grower at a farmer's market; then take them home and cook them up or eat them straight away.
In fact, apricots are at their very tastiest when they are ripe to the point of smooshi-ness. When you are prepping them, just cut out the really dark bruises or tough scaly patches they sometimes get, (the tough skin doesn't soften as it cooks.) Be sure to use the really ripe soft ones - they are the best of all!
The 2011 California apricot crop was a complete bust, (bloom+rain = sleeping bees= no fruit) so I was unable to make jam. Because I wanted to use sugar-free apricot jam in my almond butter thumbprint cookies, I wound up buying two different brands of xylitol-sweetened apricot jam. Phooey. They both just tasted like..... nothing.
This recipe, which I adapted from Gourmet Cookbook, could never be called dull. Tangy, flavorful - oh, boy! (How good is it? I gave a jar to my friend Shiela, and she confessed to enjoying it so much she started eating it with a spoon straight out of the jar.)
Interestingly, the recipe includes almond extract, which is extracted from the "bitter almond" kernels inside the apricot pit; although you won't be able to detect the flavor of the almond in the jam, the extract enhances the apricot flavor on a very deep level. This jam will not disappoint!
Sugar-Free Apricot Jam
(adapted from Gourmet Cookbook)
| A Case of Frog Hollow Seconds |
5 pounds ripe organic apricots or apriums
1/3 cup fresh squeezed lemon juice
10 tsp calcium water
2 1/2 - 3 cups erythritol
1 - 1 1/2 cups xylitol*
1 1/4 tsp stevia extract powder
7 1/2 tsp low sugar pectin (such as Pomona)
1/2 tsp almond extract
1 tsp unsalted butter (this keeps the jam from foaming up)
If the jars are brand new, wash them and the rings and lids to remove any chemicals left from processing. If they have been sitting in the basement, check them for dust, and wash off any you find. Put the jars and rings into a very large stockpot or canning pot and fill with hot water to cover by an inch or two. Put them on the rear burner of the stove over high heat and bring them to a boil. When they come to a boil, turn the heat down to a simmer and keep them hot and ready.
Following the instructions in your low sugar pectin kit, make calcium water. (I use Pomona brand.)
Meanwhile, prepare the fruit: wash it, dry it, remove the pits, cut the apricots in small chunks and put it in an 8 quart, heavy stock pot, along with the calcium water and the lemon juice. Put it on the stove and cook over medium heat, stirring occasionally, until it comes to a full boil.
While the fruit cooks, measure the sweeteners into a medium-sized bowl; if the fruit is sweet, start with the smaller amount - you can always add more later. If the fruit is tart, you can go straight to the higher amount if you wish. Add the pectin to the sweeteners and whisk them all well to combine.
Cook the fruit until it comes to a full boil, softens and becomes the consistency of chunky apple sauce. (See picture below.) When the fruit is ready, get a long-handled wooden spoon ready, and gradually add the sweetener mix to the hot fruit, stirring constantly as you pour in the sweeteners. Stir well and frequently to dissolve the pectin and the sweeteners with the fruit and to prevent lumping. Add the almond extract and the butter. (The butter is optional, but keeps the foam in check.) Bring it back to a full boil, stirring frequently to prevent scorching. Taste and adjust sweetness as necessary. Turn off the heat. Get ready to can. (Don't worry if it isn't as thick as jam; it thickens as it cools.)
| This jam is about ready to have the sweetener/pectin mix added |
Clear a good sized work surface near the stove, and cover it with clean dishtowels (preferably ones you don't care about!)
Turn the heat off under the pot of jars and move it to the front of the stove so you can reach them easily, and move the jam to the back of the stove so you don't get water into it by accident. (Put the lid on the pot of jam if necessary.) Using tongs or a jar lifter in your dominant hand, and a clean dishtowel in your other hand, carefully remove the lids and rings and drain them on the towels on your work surface. Lift each jar out of the hot water, dump the hot water back into the pot, and carefully guide and transport the hot jar over to the work table, using the towel in your non-dominant hand to support the jars until you get it safely to its destination. Turn it upside down to drain out the extra water. Repeat until all of the jars are drained and ready. Scald your best ladle and wide-mouthed funnel in the boiling water and have them ready with your jars.
Turn the heat back on medium high underneath the pot of water and bring it back to a full boil while you jar the jam.
Now, again using your tongs (or a clean towel, oven mitts, or tough hands!) turn the jars right side up, and line them up to be ready to fill. If you have a wide-mouthed jar funnel (which I so highly recommend - available at any good hardware store, Bed Bath and Beyond, well stocked grocery stores, etc., for less than $5) put it on top of one of the jars.
Grab your best ladle, and bring the pot of hot jam over to your work surface. Carefully fill each jar, leaving 1/4" of space at the top. If you have a wide-mouthed funnel, the bottom should come to just the right spot. If you don't, do your best! If necessary, spoon some out to reach the right level. After you have filled all your jars, use a clean, moist towel to wipe the ring area and the top surface of the jars clean. Again, if you have a wide-mouthed funnel, you are much less likely to spill the jam onto the jars and need to clean them. If you have less than a full jar of jam, put that one straight into use and don't bother to can it.
Put the lids on, followed by the screw tops, and screw them down.
When the water bath comes back to a full boil, reduce the heat to low, and again using your tongs, carefully lower the jars back in one at a time. (The shock of the boiling water can break the jar, which is a big messy bummer.) Boil them all for 10 full minutes, then remove them with your tongs, using the same tong/towel technique described above, and let them cool on the toweled work area. If necessary, work in batches.
Notes from Christine:
* Why the range of xylitol quantities? The fruit varies widely in how sweet it is; if you have sweet fruit, use the lower amount, if tart, use the higher. You can always start with the smaller amount and add more if it needs it, but you can't subtract it once it's in!
"What's with all of these obscure sweeteners?" Erythritol and Xylitol are sugar alcohols; super low-glycemic, super low-calorie, super low-carbohydrate, and good for your teeth.
Xylitol is low in carbohydrates and is about as sweet as cane sugar. It has a fairly neutral flavor, but a little bright, almost pepperminty quality. It can be found easily at a well-stocked health food store or really good grocery store.
Erythritol has 0 carbohydrates and is very neutral in flavor - yay! But it is about 60% as sweet as sugar and is very difficult to find in stores, except in individual packets. As it is 60% as sweet as sugar, it takes quite a bit more to reach the right level of sweetness in a recipe, and this makes proportions difficult. However, its very neutral profile - and 0 carbs! make it a natural for blending with xylitol and stevia, especially since stevia is so highly concentrated. It's worth tracking it down by mail-order, or you could make a special request to a grocer to order some for you.
Stevia is a natural, calorie-free leaf extract, super concentrated and very sweet, but with a weird, bitter aftertaste and no volume; due to its highly concentrated state, one teeny-tiny scoopful (which comes in its container) is equal to a teaspoon of sugar. It is easily purchased at Trader Joe's or any grocery store.
Be aware that some Xylitol and Erythritol brands in American packaging are actually imported from China and repackaged. That is why I buy all of these directly from Xylitol USA, http://www.xylitolusa.com/ which manufactures them from North American sources.
Labels:
almond extract,
apricot,
Atkins,
erythritol,
Gourmet Cookbook,
jam,
low carbohydrate,
stevia,
sugar-free,
xylitol
Friday, May 25, 2012
Sugar-Free Strawberry Balsamic Jam
| Sugar-Free Strawberry Balsamic Jam |
This past Christmas, my friend Ondine (the one who is foodier than me) gave us one precious jar of her strawberry balsamic jam. Of course, she uses sugar, so I was only able to dip my pinky into it; but oh MY it was good. My family polished it off in no time flat.
We are now deep into May, and I have wiped out all of my sugar-free strawberry jam. I have been waiting for the strawberries to come into season enough to be consistently ripe and tasty (and for the prices to drop a little.) This week: jackpot. Organic Swanton berries (local, union picked) were $2.50 a basket at Monterey Market. Ondine was nice enough to share some guidelines; she used a recipe by Eugenia Bone, but added vanilla. So I, of course, based my version on Ondine's, but with no added sugar. Mmm mmm mmm. The balsamic both balances and enhances the sweetness and acidity of the berries, and the vanilla brings in undercurrents of yum. The darkness of the vinegar also makes the color of the jam more like a garnet than a ruby. You will not be disappointed, I promise!
Sugar-Free Strawberry Balsamic Jam
6 pounds of ripe, perfect, organic strawberries (7 green 1 pint baskets)
| Lovely Swanton Berries |
7 tsp pectin
2 1/2 cups erythritol
1 2/3 cup xylitol
1 level teaspoon stevia extract powder
1 tsp unsalted butter
1/3 - 2/3 cup balsamic vinegar
2 - 2 1/2 tsp organic vanilla
Makes 6 pint and 4 half pint jars of jam
If the jars are brand new, wash them and the rings and lids to remove any chemicals left from processing. If they have been sitting in the basement, check them for dust, and wash off any you find. Put the jars and rings into a very large stockpot or canning pot and fill with hot water to cover by an inch or two. Put them on the rear burner of the stove over high heat and bring them to a boil. When they come to a boil, turn the heat down and keep them hot and ready.
Following the instructions in your low sugar pectin kit, make calcium water. (I use Pomona brand.)
Meanwhile, prepare the fruit: wash it, dry it, remove the hulls, and cut it in half (if small) in quarters (if medium sized) or into eighths (if very large) and put it in an 8 quart, heavy stock pot, along with the calcium water. Put it on the stove and cook over medium heat, stirring occasionally, until it comes to a full boil.
While the fruit cooks, measure the sweeteners and the pectin into a medium sized bowl and whisk them all well to combine.
When the fruit comes to a full boil, get a long-handled wooden spoon ready, and gradually add the sweetener mix to the hot fruit, stirring constantly as you pour in the sweeteners. Stir well and frequently to dissolve the pectin and the sweeteners with the fruit and to prevent lumping. Add the butter. (The butter is optional, but keeps the foam in check.) Bring it back to a full boil. Turn off the heat, then add 1/3 cup vinegar and vanilla and stir well to combine. Taste it, and if needed, add more vinegar, vanilla, or sweetener.* see notes below. Get ready to can. (Don't worry if it isn't as thick as jam; it thickens as it cools.)
Clear a good sized work surface near the stove, and cover it with clean dishtowels (preferably ones you don't care about!)
Turn the heat off under the pot of jars and move it to the front of the stove so you can reach them easily, and move the jam to the back of the stove so you don't get water into it by accident. (Put the lid on the pot of jam if necessary.) Using tongs or a jar lifter in your dominant hand, and a clean dishtowel in your other hand, carefully remove the lids and rings and drain them on the towels. Lift each jar out of the hot water, dump the hot water back into the pot, and carefully guide and transport the hot jar over to the towels. Turn it upside down to drain out the extra water. Repeat until all of the jars are drained and ready. Scald your best ladle and wide-mouthed funnel in the boiling water and have them ready with your jars.
Turn the heat back on medium high underneath the pot of water and bring it back to a full boil while you jar the jam.
Now, again using your tongs (or a clean towel, oven mitts, or tough hands!) turn the jars right side up, and line them up to be ready to fill. If you have a wide-mouthed jar funnel (which I so highly recommend - available at any good hardware store, Bed Bath and Beyond, well stocked grocery stores, etc., for less than $5) put it on top of one of the jars.
Grab your best ladle, and bring the pot of hot jam over to your work surface. Carefully fill each jar, leaving 1/4" of space at the top. If you have a wide-mouthed funnel, the bottom should come to just the right spot. If you don't, do your best! If necessary, spoon some out to reach the right level. After you have filled all your jars, use a clean, moist towel to wipe the ring area and the top surface of the jars clean. Again, if you have a wide-mouthed funnel, you are much less likely to spill the jam and need to clean the jars. If you have less than a full jar of jam, put that one straight into use and don't bother to can it.
Put the lids on, followed by the screw tops, and screw them down.
When the water bath comes back to a full boil, reduce the heat to medium, and again using your tongs, carefully lower the jars back in one at a time. (High heat might break the jar - bummer.) Boil them all for 10 full minutes, then remove them with your tongs, using the same tong/towel technique described above, and let them cool on the toweled work area. If necessary, work in batches.
Notes from Christine:
Why organic strawberries? If you can't afford much organic food in your budget, strawberries are a must (as are bananas, red peppers and apples.) The way conventional strawberries are raised leave tons of poison on the berry, releases gases into the environment, and endangers farm workers.
Balsamic Vinegar: What kind should I use, and how much? I used Bariani, which is local, concentrated and delicious, but not very expensive. Ondine said she used the cheapest stuff from Trader Joe's. I used 1/3 of a cup in my first batch - yum, then I added another 1/4 cup to my second batch (plus another 1/2 tsp vanilla) - even more yum; if you use cheaper stuff, you may want to add more to achieve the same level of flavor. I'll let you in on a little secret shared with me by the former head chef of a well-regarded local restaurant; balsamic vinegar concentrates through evaporation as it ages. The oldest, sweetest, and most syrupy stuff is quite expensive. You can mimic this by taking some cheap stuff and cooking it down in a non-reactive sauce pan.
* Deciding how much vinegar and vanilla to add can be a little tricky; jam doesn't taste the same hot as it does cold. When the jam is hot, the flavors are amplified. On my first batch, I added 1/3 cup of flavorful, concentrated vinegar, and 2 tsp of good vanilla. It was awesome when it was hot, but the flavors had toned down when it cooled. On the next batch, I decided to pump up the flavor, so I added an additional 1/4 cup of vinegar. When I tasted it, I got nervous... the flavor was intense - ack! I thought I'd added too much. I added another 1/2 tsp of vanilla to balance it.... Still intense... I was a little nervous about the outcome, but I went ahead and canned it - and it was awesome when it cooled off! So, be brave.
"What's with all of these obscure sweeteners?" Erythritol and Xylitol are sugar alcohols; super low-glycemic, super low-calorie, super low-carbohydrate, and good for your teeth.
Xylitol is about as sweet as cane sugar, has a fairly neutral flavor with a little bright, almost pepperminty quality, and can be found easily at a well-stocked health food store or really good grocery store.
Erythritol, very neutral in flavor, is about 60% as sweet as sugar, and is very difficult to find in stores, except in individual packets. As it is 60% as sweet as sugar, it takes quite a bit more to reach the right level of sweetness in a recipe, and this makes proportions difficult. However, its very neutral profile makes it a natural for blending with xylitol and stevia, especially since stevia is so highly concentrated. It's worth tracking it down by mail-order, or you could make a special request to a grocer to order some for you.
Stevia is a natural, calorie-free leaf extract, super concentrated and very sweet, but with a weird, bitter aftertaste and no volume; due to its highly concentrated state, one teeny-tiny scoopful (which comes in its container) is equal to a teaspoon of sugar. It is easily purchased at Trader Joe's or any grocery store.
Be aware that some Xylitol and Erythritol brands in American packaging are actually imported from China and repackaged. That is why I buy all of these directly from Xylitol USA, http://www.xylitolusa.com/ which manufactures them from North American sources.
Labels:
Atkins,
balsamic vinegar,
erythritol,
Eugenia Bone,
low-carb,
Ondine,
Ondine Gibbs,
organic,
stevia,
strawberry,
sugar free,
vanilla,
Well-Preserved,
xylitol
Thursday, May 17, 2012
Sugar-Free (Low-Carb) Linzertorte
![]() |
| Sugar-Free Linzertorte |
Mmmm.... Linzertorte. I can't think of anything tastier just now. But perhaps you are wondering what it is? Linzertorte is a classic Viennese pastry; a rich, buttery dough with lots of toasted ground hazelnuts, pressed into a tart pan, topped with raspberry jam, and then criss-crossed with a lattice of more of the dough. The rich dough balances the sweetness of the jam, the tart sweetness of the jam does the same for the dough. This recipe calls for lemon zest in the dough, which adds yet another layer of contrast and brightness. Oh my.
Another beauty of Linzertorte is that it is very easy to make, but looks and tastes like you had to go to culinary academy to master it. Love it! Make this the next time you really want to impress your guests.... or when you just want a really good treat.
Sugar-Free (Low-Carb) Linzertorte
![]() |
| Toasted Hazelnuts |
6 1/2 ounces of hazelnuts
1 3/4 sticks unsalted butter, softened
3 large egg yolks
1 tsp apple sauce
1 TB finely grated lemon zest
1/4 cup erythritol
2 1/2 TB xylitol
4 scoops stevia
![]() |
| Dough Strips |
1 1/4 cups whole wheat pasty flour
1/4 cup + 2 TB almond meal
1/4 cup + 2 TB soy protein
1 1/3 cups sugar-free raspberry jam
Equipment: a 9" tart pan (or springform)
A food processor or grinder for the nuts
A mixer
1. Toast and skin the hazelnuts. (Spread them on a baking sheet in a pre-heated, 350 F oven. Toast for about 10 minutes, until they are golden and aromatic. Cool them. A few handfuls at a time, put them in a tea towel and rub them together to rub off the skins.) Discard the skins.
2. In a food processor, grind the hazelnuts until they are a fine meal - but be careful not to turn them into nut butter.
3. In a small bowl, combine the sweeteners and whisk to combine well.
4. Measure the various flours, nut meals and salt into a medium bowl; use the "spoon and sweep" method to measure the whole wheat pastry flour (spoon the flour into the dry measuring cup, sweep off the excess with the back of a knife. This ensures that you don't accidentally use compacted flour, which throws off the proportions.) Whisk to combine.
5. Using your mixer, cream the butter and sweeteners together at high speed until light and fluffy. Add the applesauce, then add one egg yolk at a time and beat just to combine. Add zest and beat until just combined.
6. Beat in the flour/nut meal mixture until well combined. The dough will be stiff.
7. Take the dough out of the bowl and divide into two even balls. Wrap them in waxed paper and press into disks. Refrigerate for about 1/2 hour; if much longer, you will need to soften the dough up a bit to work it. (You can make the recipe up to this point a day in advance; just allow enough time for the dough to soften.)
8. Remove the dough from the refrigerator. Preheat the oven to 375 F.
9. Place one disk of dough in the bottom of the 9" tart pan. Using your fingers (and perhaps the back of a wooden spoon) press the dough evenly all over the base of the pan and all the way up the sides. Add the jam and smooth it over the bottom.
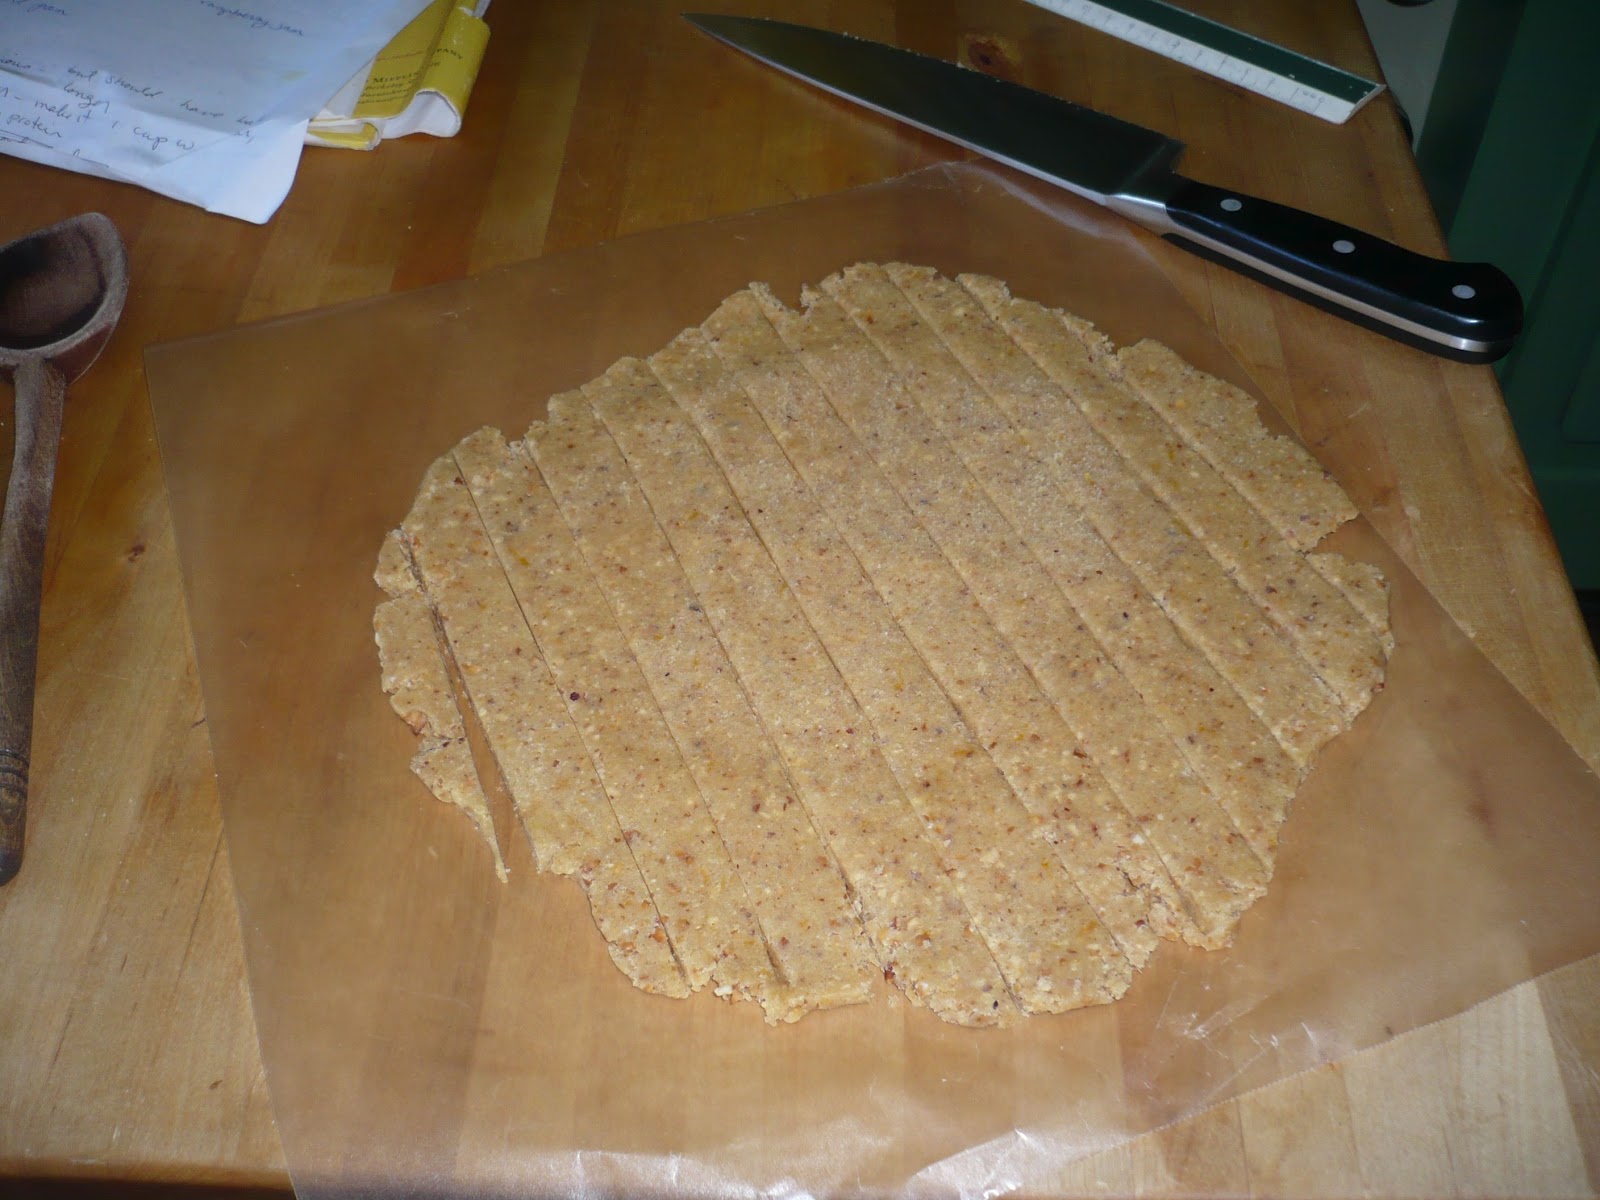
10. Take the second disc of dough and place it between two sheets of wax paper. Roll it into an even circle that is slightly bigger than the 9" pan. Slice the circle into strips 1/2" wide. Transfer half of the strips one at a time to the top of the tart, arranging the strips 1" apart from each other, and pinching the ends onto the sides of the bottom dough. (This takes a little planning; remember that you will need the longest strip for the center, and that you will need to match it going the other way - don't use up the long ones on the short sections!) Turn the tart sideways and repeat going the other way, making a simple cross lattice. Pinch all of the ends, or use a fork, to attach the strips to the sides of the dough.
![]() |
| Finished tart before it goes in the oven |
11. Place the tart on a baking sheet and put it in the lower center of the pre-heated oven. Bake until quite golden, about 30 minutes. Remove from the oven, cool on a rack for an hour or more, then carefully push the bottom plate up through the center ring to remove the side ring of the pan. Place the tart on a large plate.
12. Slice in very small pieces, as this is very rich. Lovely with coffee, delicious for dessert, afternoon tea, or even breakfast. (Yum.)
Notes: Jam - you can make your own sugar-free raspberry jam, as I did. Or, you can buy a pretty good xylitol sweetened jam made by Nature's Hollow, which I found at our local natural foods store. Xylitol USA also offers a decent version, also sweetened with xylitol, and sold through their website.
Labels:
almond meal,
erythritol,
flax meal,
high-protein,
linzertorte,
low sugar,
low-glycemic,
raspberry,
soy protein,
stevia,
sugar free,
sugar-free,
xylitol
Monday, March 26, 2012
(Sugar-Free, Low-Carb) Granola with Flax
![]() |
| Sugar-Free, Low-Carb Granola |
As with so many of my low-carb creations, this new recipe was born one day when I was thinking wistfully about eating some of my yummy maple granola with flax. Or rather, thinking about how I couldn't eat it anymore, and yes, feeling a little sorry for myself. Sniff. Sniff. Isn't it interesting that inspiration is often born out of desperation? I immediately thought about how I could make sugar-free, low-carb granola; I would raise the amount of protein and lower the amount of carbohydrates by replacing a substantial percentage of the grains with nuts, seeds, and coconut. (And coconut is good for the immune system, too!) There was just one problem; what to use as a sweetener?
I love using the sugar alcohols erythritol and xylitol; they are naturally low glycemic and low carbohydrate. They even help prevent tooth decay. There's just one major problem; their drive to re-cyrstalize is very hard to overcome. If you dissolve some in boiling water and let it sit, it will turn into rock candy in less than 24 hours. In my baked goods, I prevent this by using plenty of moist, fiber-filled fruits and vegetables (apple sauce, sweet potatoes, bananas) which bond with the sugar alcohols and keep them from linking back up again. Unfortunately, I didn't see how that would work with granola. And of course, stevia has that yucky licorice-y aftertaste - not what I wanted at all.
There is a third commonly used sugar alcohol which readily stays in a looser, liquid state; maltitol. Maltitol has the consistency and appearance of light corn syrup, and has a very neutral flavor. It is very commonly used in commercial sugar-free products, such as sugar-free chocolates and energy bars, presumably because of its resistance to re-crystalizing. There is only one problem with maltitol - okay, two. The first is that, far more than any of the other sugar substitutes, it causes intense flatulence. I could deal with this by using it very sparingly, but.... the other problem is that it is not readily available to the general public, sold only to food manufacturers. After googling extensively, I was able to find some retailed on the internet.
By using some stevia along with the malitol, I was able to use the malitol sparingly, helping each sweetener to overcome its issues. And the results? This granola was really, really, REALLY good.
*BUT.... UPDATE: JULY, 2014: Since writing this post, I have done further research on maltitol which makes me uncomfortable with using it or promoting it. Many sources now say that maltitol raises blood sugar, and actually has a much higher number of usable carbs in it than the label indicates. Given all this, I will no longer be buying, or using, products with maltitol.
Enter the new darling of the low-carb world: yacon syrup! Yacon is a South American tuber, much like jicama in flavor. When squeezed and cooked down, it creates a thick, dark, tangy syrup which is nutrient-rich, low glycemic, and very good for you. As usual, it's expensive. As usual, it's hard to get. And since Dr. Oz promoted it, a shortage hit. Sigh. Friends at Coracao Confections (organic, raw, low-glycemic, vegan, and fantastic!) referred me to Raw Food World for their syrup. These folks are lovely - great customer service, good products - and I've stocked up. Again, buy using stevia, you can stretch your yacon syrup in the recipe.
The best way to eat it, in my opinion, is with whole milk Greek yoghurt, which is creamy and delicious, and very low in carbs. The Fage brand has the lowest carbohydrate content of all of the other brands whose labels I've examined, and is super thick, rich and mild-tasting - no sour yoghurt action at all. Trader Joe's also makes a very good whole milk Greek-style yoghurt - and at a great price! I like to sweeten the yoghurt with some erythritol, and then add a little vanilla for flavor. Let it sit for a moment to allow the erythritol crystals to dissolve into the yoghurt. Then sprinkle on the granola....... mmmm.
Sugar-Free, Low Carb Granola with Flax
2 cups quinoa flakes
2 cups rolled oats (not quick cooking oats)
OR: 4 cups rolled oats
1 1/2 cups unsweetened coconut flakes - the big pieces, not the shredded kind
1/2 cup flax seeds
1 cup toasted almonds, preferably slivered
1 cup walnuts, broken into smaller pieces
1 cup pecans, broken into smaller pieces
(or your choice of nuts)
1/4 cup pumpkin seeds
1/4 cup sesame seeds
1/4 cup sunflower seeds
3/4 tsp powdered stevia extract
3 TB flax oil
3 TB coconut oil, or a neutral oil such as canola or sunflower
4 TB yacon syrup or 6 TB maltitol syrup
Pre-heat the oven to 350 F. Combine all of the grains and nuts in a large bowl. Sprinkle the stevia powder over the top and toss and stir to combine well.
In an microwave proof cup (such as pyrex) measure all of the oils and the yacon syrup. Heat them in the microwave until they are hot and have thinned out.
Pour the liquids all over the grain mixture, and stir well to coat all of the contents. Pour the granola mixture into a roasting or baking pan large enough to hold it all.
When the oven is at temperature, place the pan onto a rack in the center of the oven. Set the timer for 15-20 minutes. After the timer goes off, stir well to redistribute the contents. Set the timer for 10-15 minutes, and stir again. Be careful not to let the contents burn; your goal is golden toasting and drying of all the layers. Set the timer for 5-10 minutes, and stir again. If it is golden through and through, remove it from the oven and turn the oven off. If it is not yet golden, return it to the oven for another 5 minutes or so. At this point, you can turn the oven off and let the granola toast in the residual heat left in the oven.
Cool in the pan, and then store in an airtight container. It will keep for several weeks, but is at its tastiest when it is fresh.
Labels:
coconut,
erythritol,
flax,
flax oil,
flax seeds,
granola,
high protein,
low carbohydrate,
maltitol,
nuts,
oats,
quinoa,
rolled oats,
stevia,
sugar-free,
xylitol,
yacon syrup
Pumpkin Bread (High protein, sugar-free, low-carb)
I grew a nice big crop of butternut squash last year. Unfortunately, the seedlings got such a late start that by the time the squashes were ripe, it was so late in the season that they didn't cure properly before I had to harvest them. So there I was, mid-winter, looking at all of my beautiful squashes, which were growing a thatch of furry white mold on their crowns. Phooey. I had to cut off the bad parts and rescue the good parts, but NOW.
Little known fact: most canned "pumpkin" in the store is actually butternut squash. Another little known fact: there are special eating pumpkins, like Sugar Pie Pumpkin, and then there are jack-o-lantern pumpkins. Eating pumpkins are sweet and tender. Jack-o-lantern pumpkins are tough and fibrous, not intended for eating at all.
So, anyway. I cleaned up the squashes, throwing the bad stuff into the compost heap and peeling and chopping the good parts. I put the cubes of squash into a ceramic bowl, covered them in water, put a plate on top and cooked them in the microwave. Then I mashed them up well. And now: it's "Pumpkin" Bread time.
I decided to go for a little more decadence than I normally do in my quick breads; there's melted butter built-in to this luscious bread. Rich, dark, a little spicy with caramel notes; it is excellent for breakfast, or for an afternoon pick-me-up with tea or coffee. It's wonderful on its own, but toasted, with a little whipped cream cheese smeared on top, or even a little more butter (!) - heaven! After I made the first loaf, here's what I wrote on the recipe draft: "Wow! Delicious."
A word about the optional coconut palm sugar; this super low glycemic sugar is the new darling of the low glycemic/diabetic crowd. Even Dr. Oz did a segment on it on his show, recommending it as a way to lose weight by preventing sugar crashes. It has delectable caramel notes that echo the vanilla in the bread. The bread is wonderful without it, but if you have a chance to add it, it brings a surprising amount to the party.
Pumpkin Bread
I.
1 cup pureed pumpkin or butternut squash
1/2 cup melted butter or oil
2 large eggs, lightly beaten
1/2 tsp vanilla
1/4 cup water
II.
1/4 tsp freshly grated nutmeg
1/2 tsp cinnamon
1/4 tsp ground allspice
1/3 cup erythritol
2 TB xylitol
5 tiny scoops stevia extract powder
1 TB coconut palm sugar (optional, but delicious)
III.
3 TB flax meal
3 TB soy protein
3 TB almond meal
3 TB unflavored, unsweetened whey powder
3/4 cups whole wheat pastry flour
1 tsp salt
1 tsp baking soda
IV.
1/2 cups chopped walnuts
1. Preheat the oven to 350 Fahrenheit. Grease a loaf pan.
2. In a large bowl, combine all of the wet ingredients from section I and mix well.
3. In a small to medium bowl, combine all of the sweeteners and whisk them to mix well. Add them to the wet ingredients and stir to combine well.
4. In a medium bowl (perhaps the one you just used to mix the sweeteners), combine all of the dry ingredients from section III and whisk well to combine.
5. Stir the dry ingredients into the wet ingredients, mixing just enough to combine well.
6. Stir in the chopped walnuts.
7. Pour the batter into the prepared loaf pan, smoothing the surface with a spatula.
8. Bake for about 1 hour, until a toothpick inserted in the center comes out clean. Let the loaf cool in the pan for about 15 minutes, then tilt out of the pan onto a cooling rack to complete cooling.
Subscribe to:
Posts (Atom)


