Showing posts with label almond meal. Show all posts

Sunday, April 19, 2015

Sugar-Free Clementine Cake


My friend Shiela is very fond of the movie The Secret Life of Walter Mitty, in which, interestingly, Clementine Cake is featured prominently. After multiple viewings, she became so intrigued with the idea of this cake that she Googled it, immediately found a great recipe from The New York Times, baked it, and raved about it. I have never seen the movie, but when she described the recipe to me, I knew immediately that it was a winner, and one that I could easily adapt to sugar-free goodness. The results? Oh, this is good. The crumb is moist, the flavor intense, the crust chewy.... Excellent for breakfast or afternoon tea; full of protein and fiber. I can see making this into individual tea cakes, too....

Sugar-Free Clementine Cake

Adapted from The New York Times


  • 5 medium clementines or tangerines (1 pound)
  • Spray cooking oil
  • 6 large eggs
  • 1 cup sugar substitute (I am loving Swerve!)  
    ¼ cup melted butter
  • 1 teaspoon salt
  • 2 cups almond flour or meal (Bob's Redmill and Trader Joe's are great sources)
  • 2 teaspoons baking powder


Poached Clementines

PREPARATION

  1. Place whole unpeeled clementines in a medium-sized sauce pan, cover with cold water and bring to a boil over high heat. Reduce heat to low, cover and simmer gently for 2 hours, adding more water as needed. Remove clementines with a slotted spoon and, once cool enough to handle, halve and remove any seeds or other hard bits. Purée in a food processor, immersion or conventional blender and set aside. (May be done up to 2 days ahead and refrigerated.)
  2. Heat oven to 350 degrees. Spray a 9-inch springform pan with cooking oil, line bottom with parchment paper and spray paper with oil.
  3. In a large bowl, whisk the eggs together with the melted butter, sugar substitute, salt and clementine purée. Add the almond flour and baking powder and stir until just combined.
  4. Pour into prepared pan and bake until edges are golden brown and starting to pull away from sides of pan, about 1 hour. Transfer to wire rack set over baking sheet. After 10 minutes, run a knife around edge of pan to loosen cake; remove cake from pan. Peel off parchment paper and return cake to wire rack to cool completely. Decorate with dusting of powdered sugar or with chocolate glaze or candied clementines, or both.

Tuesday, March 10, 2015

New: Sugar-Free Banana Bread


Even after I have created a new recipe and found it delicious, I continue to tweak it; I work on lowering the carbohydrates and raising the deliciousness. And frankly, sometimes I lose confidence in ingredients that I was fond of; soy  - not so thrilled with how it's raised.  These days, I'm pretty excited about working with coconut flour. It is low in carbs, very high in fiber and protein, and has a fine crumb and a lovely sweet base flavor, perfect for cakes and cookies. However, all that fiber tends to suck up the liquid, and creates a strong drying effect. This is where a fruit quick bread is the perfect pairing; the moisture in the fruit binds with the coconut fiber. This, plus the addition of almond meal and additional eggs creates a moist, flavorful loaf. In this case, the new formula is so much more delicious than the old, I decided to do a new posting. One word of warning: the lower the wheat content, the lower the gluten. The lower the gluten, the lower the crown. This recipe is completely delicious, but it has a lower profile than you might be used to!

Group 1
4 small, very ripe bananas, or 3 large, mashed
3 large eggs
1/3 cup erythritol
2 TB xylitol
1/4 tsp stevia extract powder
1 TB coconut palm sugar (optional, but delicious - for flavor)
1 tsp pure vanilla extract

OR:
2/3 cup xylitol or Swerve
1 TB coconut palm sugar
1/4-1/2 tsp stevia extract powder

Group 2
1/2 cup whole wheat pastry flour
1/2 cup coconut flour
1/4 cup almond meal
2 TB flax meal
1 tsp salt
1 tsp baking soda

Group 3
1/2 cup walnuts, broken into medium pieces

1. Preheat oven to 350 F. Grease loaf pan. (Gotta love spray-on coconut oil!)

2. Combine mashed bananas, eggs, sweeteners and vanilla in a large bowl and stir well to combine.

3. In a medium bowl, combine flours, salt and leavening. Whisk to combine, carefully breaking up any lumps of meal or flour. (Coconut flour does have a tendency to lump.)

4.  Stir flour mixture into banana mixture. Stir until all lumps and dry spots are well incorporated.

5. Stir in walnuts until well distributed.

6. Scoop batter into greased loaf pan and smooth top.

7.  Place pan on middle rack of preheated oven. Bake until toothpick inserted in center comes out clean, around 50 minutes to 1 hour.

8. Cool on rack until cool enough to tip out of pan. Cool completely on rack out of pan.


Sunday, August 31, 2014

Sugar-Free, Low-Glycemic Pecan Pie


My daughter requested a pecan pie as a special reward for all of the hard work she'd been doing for school. I have a recipe from Cook's Illustrated which calls for maple syrup instead of corn syrup - super delicious! And having made it for her, once again I found myself feeling a little sad about how I was never going to get to eat that delicious item again.... or was I?

I started thinking about yacon syrup, a nutritious, super low-glycemic syrup made from a South American tuber. Yacon syrup has been shown to have amazing properties as a product for folks with diabetes and metabolic disorders. I've been eating it in the divine chocolates created by Coracao Confections for several years now, and it has recently become the darling of Dr. Oz. Yacon syrup is dark, thick, sweet, but at the same time tangy. It reminds me a bit of maple syrup, but even more so of tamarind. I decided that it could be the perfect substitute for corn syrup or maple syrup in a pecan pie. But first I had to get my hands on some... I have yet to see it on grocer's shelves - even health food stores. My friends at Coracao turned me on to Raw Food World, which they have been doing business with for some time. That took care of that issue, and it was on to recipe creation.

You know, sometimes when I try a recipe the first time, it's just a complete fail. Sometimes it needs some tweaking. And sometimes, rarely, it's fantastic the very first time. That's the story with this pie, my friends. Go forth and enjoy the yumminess once more!


Sugar-Free, Low-Glycemic Pecan Pie

1 batch of whole grain Foodier Than Thou pie crust  and a 9" regular (shallow) pie dish OR
1 batch of Foodier Than Thou almond meal crust (skip the almond extract) and a tart pan


1/4 cup coconut palm sugar OR an additional 1/4 cup of sugar substitute
1/4 cup of your favorite sugar substitute: Swerve, Lakanto, Splenda OR erythritol
1-2 tsp stevia powder - to taste. (You may want the higher amount if you use erythritol, which is less sweet than the other sweeteners.)


1 cup yacon syrup
1/2 cup heavy cream

4 TB unsalted butter, cut into 1/2" pieces
1/2 tsp salt 

6 large egg yolks, lightly beaten

1 1/2 cups toasted, chopped pecans or walnuts

1.  Preheat the oven to 450 F.

2.  In a heavy saucepan, combine the sugar, sugar substitutes and stevia powder until well combined. Add the yacon syrup and heavy cream, place over medium heat, and stir occasionally, until the solids have dissolved, about 5 minutes.

3. Remove from heat and let mixture cool for 5 minutes. Add the butter and salt and whisk until incorporated. Then whisk in egg yolks until well incorporated.

4. Put pie crust into pan and crimp the edges. If using the almond meal crust in a tart pan, press the crust well into the pan with your hands and/or a wooden spoon. If using the almond meal crust and tart pan, you will have some extra crust and filling. If so, use them to make some small ramekins of pie.

5. Sprinkle the chopped, toasted nuts into the bottom of the crust. Carefully pour the liquid filling over the top. Use a rubber spatula to get all of the yummy stuff into the pan.


6. Carefully place the pie onto a baking sheet and place on the central rack of the hot oven, and immediately reduce the temperature to 325 F. Bake until the filling is set and the center jiggles only slightly when the pie is gently shaken, 45-60 minutes.

7. Remove pie from oven and cool on a rack for at least an hour. Then refrigerate until set, at least another hour, and up to one day, or just cool on the rack for several more hours. If you rush to cut it, it will not be solid! (It's hard to resist; believe me, I know!) Bring to room temperature before serving.

8. Serve small wedges, with optional Bourbon Whipped Cream - which really adds a lot to the party!


Bourbon Whipped Cream
(Adapted from Cook's Illustrated)


1 cup heavy whipping cream
2 TB bourbon

2 TB coconut palm sugar
1/2 tsp vanilla extract

Combine all ingredients in a bowl and whip until stiff peaks form.  Serve with pecan pie. Yum!


Sunday, July 13, 2014

Sugar-Free Stone Fruit Cake

SUGAR-FREE PEACH/APRICOT CAKE

The finished product - golden brown and luscious


Is this a cake, a tart, a pie.....? Call it what you will, this is the perfect use of all of the apricots, peaches, nectarines, and plums dropping off the trees at this time of year! This delicious recipe is so easy and so good, you may find yourself making it several times in one week. Not being very sweet, it makes a lovely coffee cake, breakfast, snack, or dessert. Try any stone fruit, and if you wish, replace a cup or so of the stone fruit with some fresh blueberries. As always, this recipe is sugar-free, high protein, and low-carbohydrate. Although this is perfect for folks like me who are diabetic or have a metabolic disorder, everybody else loves it, too. Only YOU will know that it's sugar-free!

Preheat the oven to 375 F.

PASTRY

Press the dough firmly and gently up the sides
1 1/4 cups almond meal
1/4 cup whole wheat pastry flour
1/4 tsp salt
1 tsp baking powder
1/2 cup Swerve OR 1/4 cup erythritol + 2 TB xylitol + 1/2 tsp stevia powder
6 TB unsalted butter, cut into small pieces
1 tsp almond extract
1 large egg


Mmmm - super ripe Royal Blenheim apricots from my tree!
FILLING
2 1/2 pounds stone fruit, washed, dried, pitted and cut into fourths (apricot, peach, nectarine, or plum)
OR replace 1/2 pound of fruit with 1 cup fresh blueberries
2 TB almond liqueur
1/2 cup Swerve OR 1/4 cup erythritol + 2 TB xylitol + 1/2 tsp stevia powder
1 TB tapioca flour OR 1 TB tapioca quick-cooking tapioca


For the Pastry: 
1. Using a food processor, pulse the almond meal, flour, salt, baking powder, and sweeteners until they are just combined. Add the butter and pulse until the mix resembles coarse meal, with some pea-sized butter chunks. Add the egg and almond extract and pulse until it just comes together.

2. Using floured fingers, press the pastry into a spring form pan, flattening with the palm of your hand, and coaxing it up the sides of the pan until it reaches half way up the sides. (You want the pastry to be as least as high as the fruit.)

3. Chill the pan in the refrigerator until firm, at least 15 minutes.

For the Filling:

1. Meanwhile, prepare the fruit. Wash, dry, pit, and cut the fruit into chunks. Add the almond liqueur and stir to combine.

2. In a small bowl, whisk the sweeteners with the tapioca flour thoroughly (available from the bulk section of Berkeley Bowl or in packages from Bob's Red Mill), or, if you are using quick tapioca, whirl the sweeteners with the tapioca in a spice mill until the tapioca becomes a flour.

3.  Sprinkle the fruit with the sweetener mix, and stir gently to combine thoroughly. Spoon the fruit mixture evenly into the chilled springform pan. Cover with foil, place on a baking sheet (the butter does tend to leak out the bottom.) and bake, covered, for around 1 hour and 20 minutes, until the crust is golden brown around the edges.
The filling should come just below the pastry line


4. Cool, uncovered, on a rack, for at least 1/2 an hour. Carefully remove the sides of the springform and put on a platter. Wait until the cake is thoroughly cooled before serving; the filling will firm as it cools.


Friday, April 11, 2014

Creamy, Delicious, Low-Carb Cheesecake


For some time I have been enjoying the delicious, low-carb "breakfast" cheesecake I invented a while back; it's very yummy, and nice and easy to make. However, I really was missing the delightful contrast in texture and flavor you get from a classic graham cracker crumb crust cheesecake. For the life of me I couldn't think how to make something that would work.... make low carb, sugar free graham crackers, just so that I could make crumbs out of them? That didn't seem like a good idea. What to do, what to do?

I recently had a flash of inspiration..... what if I used almond meal, just straight up almond meal, but toasted it in a saute pan? Immediate smash hit!

This is so yummy, and really straight-forward and easy. You may have a little leftover "crumbs"; if so, they store well in the fridge for your next batch - which I predict you will be making very soon! However, they are quite tasty sprinkled on the top of the cheesecake, or even eaten straight up with a spoon.


PREHEAT OVEN TO 325 F

ALMOND MEAL "GRAHAM CRACKER" CRUST
 
almond meal before toasting

2 cups whole almond meal (I use Trader Joe's)

1 teaspoon stevia extract powder
1 tablespoon xylitol
2 tablespoons erythritol
1 tablespoon coconut palm sugar
1/4 tsp salt

2 tablespoons unsalted butter
2 tablespoons coconut oil

In a small bowl, whisk the sweeteners until well combined.

In a medium-sized skillet, toast the almond meal, stirring frequently to prevent scorching. When the almond meal is just lightly golden and fragrant, remove it from the heat. Be careful not to overcook the almond meal - it will continue to darken and toast in the hot pan even after you have removed it from the heat.

Whisk the sweeteners into the toasted almond meal until well-combined.

Finished Crust
Add the butter and coconut oil, using the residual heat from the pan to melt them. Stir until all is well-combined. Set aside.


CHEESECAKE FILLING


2 cups full-fat cottage cheese (full fat is the lowest in carbs)
1 cup full-fat cream cheese (lowest in carbs)
1/2 cup full-fat Greek yoghurt (lowest in carbs)
2 tsp pure vanilla extract
3 large eggs
1 tsp stevia
1 tablespoons xylitol
2 tablespoons erythritol
3 tablespoons coconut palm sugar

Bring all of the ingredients to room temperature.

In a small bowl, whisk together the sweeteners until well-combined.

Using an immersion blender, blender or food processor,  process the cottage cheese until smooth. Add the cream cheese, yoghurt and vanilla and process until smooth. Add the eggs and sweeteners and process until smooth.


PUT THEM ALL TOGETHER

Using your ramekin collection, put 2-4 tablespoons of the "graham cracker crust" mix in the bottom of each cup, depending on the size of the vessel and your taste. Press the crumbs down using the back of a spoon.


Spoon the filling on top of the crumb crust. The number of ramekins you make depends on the size of the ramekin and how much of the crumb mixture is in it.

When you have used all of the filling up, put them into a large roasting pan, and carefully pour boiling water all around them.


Place into your pre-heated, 325 F oven and bake until firm, around 45 minutes to 1 hour.

Devour!


Thursday, May 17, 2012

Sugar-Free (Low-Carb) Linzertorte

Sugar-Free Linzertorte


Mmmm.... Linzertorte. I can't think of anything tastier just now. But perhaps you are wondering what it is? Linzertorte is a classic Viennese pastry; a rich, buttery dough with lots of toasted ground hazelnuts, pressed into a tart pan, topped with raspberry jam, and then criss-crossed with a lattice of more of the dough. The rich dough balances the sweetness of the jam, the tart sweetness of the jam does the same for the dough.  This recipe calls for lemon zest in the dough, which adds yet another layer of contrast and brightness.  Oh my.

Another beauty of Linzertorte is that it is very easy to make, but looks and tastes like you had to go to culinary academy to master it.  Love it! Make this the next time you really want to impress your guests.... or when you just want a really good treat.


Sugar-Free (Low-Carb) Linzertorte
Toasted Hazelnuts

6 1/2 ounces of hazelnuts
1 3/4 sticks unsalted butter, softened
3 large egg yolks
1 tsp apple sauce
1 TB finely grated lemon zest

1/4 cup erythritol
2 1/2 TB xylitol
4 scoops stevia

Dough Strips
1/4 tsp salt
1 1/4 cups whole wheat pasty flour
1/4 cup + 2 TB almond meal
1/4 cup + 2 TB soy protein

1 1/3 cups sugar-free raspberry jam

Equipment: a 9" tart pan (or springform)
A food processor or grinder for the nuts
A mixer

1. Toast and skin the hazelnuts.  (Spread them on a baking sheet in a pre-heated, 350 F oven. Toast for about 10 minutes, until they are golden and aromatic. Cool them. A few handfuls at a time, put them in a tea towel and rub them together to rub off the skins.)  Discard the skins.

2. In a food processor, grind the hazelnuts until they are a fine meal - but be careful not to turn them into nut butter.

3. In a small bowl, combine the sweeteners and whisk to combine well.

4. Measure the various flours, nut meals and salt into a medium bowl; use the "spoon and sweep" method to measure the whole wheat pastry flour (spoon the flour into the dry measuring cup, sweep off the excess with the back of a knife. This ensures that you don't accidentally use compacted flour, which throws off the proportions.)  Whisk to combine.

5. Using your mixer, cream the butter and sweeteners together at high speed until light and fluffy.  Add the applesauce, then add one egg yolk at a time and beat just to combine. Add zest and beat until just combined.

6. Beat in the flour/nut meal mixture until well combined. The dough will be stiff.

7. Take the dough out of the bowl and divide into two even balls. Wrap them in waxed paper and press into disks. Refrigerate for about 1/2 hour; if much longer, you will need to soften the dough up a bit to work it. (You can make the recipe up to this point a day in advance; just allow enough time for the dough to soften.)

8. Remove the dough from the refrigerator. Preheat the oven to 375 F.

9. Place one disk of dough in the bottom of the 9" tart pan.  Using your fingers (and perhaps the back of a wooden spoon) press the dough evenly all over the base of the pan and all the way up the sides. Add the jam and smooth it over the bottom.

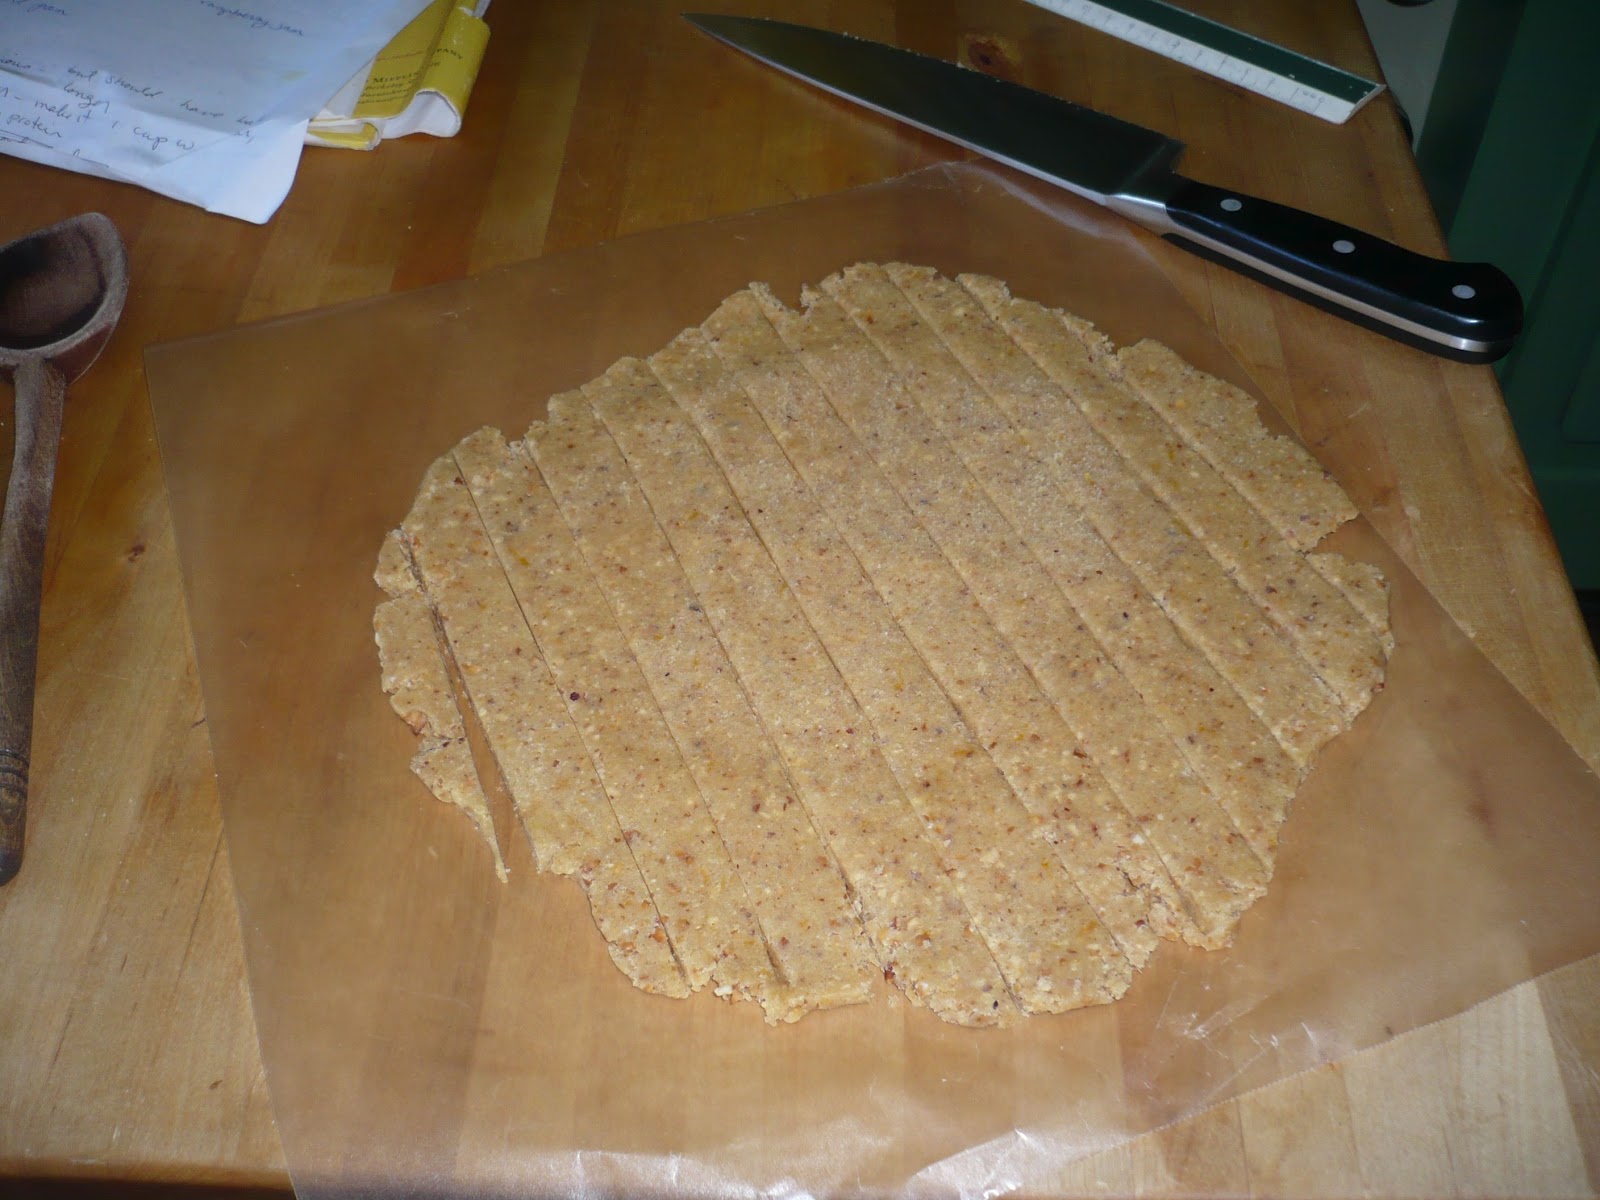
10. Take the second disc of dough and place it between two sheets of wax paper. Roll it into an even circle that is slightly bigger than the 9" pan.  Slice the circle into strips 1/2" wide. Transfer half of the strips one at a time to the top of the tart, arranging the strips 1" apart from each other, and pinching the ends onto the sides of the bottom dough. (This takes a little planning; remember that you will need the longest strip for the center, and that you will need to match it going the other way - don't use up the long ones on the short sections!) Turn the tart sideways and repeat going the other way, making a simple cross lattice.  Pinch all of the ends, or use a fork, to attach the strips to the sides of the dough.
Finished tart before it goes in the oven


11.  Place the tart on a baking sheet and put it in the lower center of the pre-heated oven.  Bake until quite golden, about 30 minutes.  Remove from the oven, cool on a rack for an hour  or more, then carefully push the bottom plate up through the center ring to remove the side ring of the pan. Place the tart on a large plate.

12. Slice in very small pieces, as this is very rich.  Lovely with coffee, delicious for dessert, afternoon tea, or even breakfast. (Yum.)

Notes: Jam - you can make your own sugar-free raspberry jam, as I did.  Or, you can buy a pretty good xylitol sweetened jam made by Nature's Hollow, which I found at our local natural foods store.  Xylitol USA also offers a decent version, also sweetened with xylitol, and sold through their website.


Friday, February 3, 2012

(High Protein, Low Carb, Low Sugar) Almond Butter Thumbprint Cookies

Almond Butter Thumbprint Cookies

 In my family, marzipan (almond paste candy) is considered one of the yummiest treats possible,  so my latest cookie recipe holds a special place in my heart.  These cookies are so delicious, so moist, so flavorful.... oh, my!  It's like eating a piece of marzipan, or of linzer torte. Divine! They have received rave reviews from everyone who has sampled them so far.  You will find it hard to believe that you can eat them and still feel virtuous; as always, they are super high-protein, super low carbohydrate, and super low-sugar.

Almond Butter Thumbprint Cookies

I.
1 1/2 cups (12 ounces) roasted, salted, unsweetened, creamy almond butter
 (well stirred)
1 stick salted (or unsalted; your choice) butter, at room temperature

II.
6 TB coconut palm sugar
1/2 cup erythritol
6 TB xylitol
8 tiny scoops stevia extract powder

III.
2 TB unsweetened applesauce
1 tsp vanilla
1 1/2 tsp almond extract
1 large egg, at room temperature

IV.
3 TB flax meal
6 TB soy protein powder
2 TB unsweetened, unflavored whey powder (or milk powder)
3 TB almond meal
3/4 cup whole wheat pastry flour
1/2 tsp salt
1 tsp baking powder

V.  Sugar-free jam; preferably raspberry or apricot*

Preheat the oven to 350 F.

Step 1:  cream the butter, then add the almond butter and cream them well together, scraping the sides of the bowl to make sure they are well incorporated.

Step 2:  measure all of the sweeteners into a small bowl, and whisk them well together.  Then add them to almond butter/butter mixture, and cream until they are well combined, again scraping down the sides of the bowl.

Step 3:  Add the egg, applesauce, vanilla, and almond extract to the butter/almond butter/sweetener mix.  Mix until well combined.

Step 4:  In a medium sized bowl, measure all of the flours and meals, salt and baking powder, and whisk to combine.  Add them to the rest of the ingredients and mix until well combined, again scraping down the sides of the bowl and the beaters to make sure everything is well mixed.

Line two baking sheets with silpats (silicone baking sheets) if you have them.  If not, don't worry; these are fine without.

Scoop a heaping tablespoonful or so of the batter and roll into a ball, placing it on the baking sheet.  Repeat, spacing the cookies.  You should be able to fit all the cookies onto the two baking sheets, a dozen plus a few more per sheet. (The dough does not run much as it bakes.)  Using your thumb, press a dimple into the center of the cookie, flattening the ball slightly as you do so.  Repeat with all of the cookies.


Place both baking sheets into the pre-heated oven.  Bake for 15 minutes, until just beginning to become golden brown all over.  Remove the pans from the oven, and if the dimples have leveled out too much, press them in again using a spoon or the handle of a wooden spoon.  Spoon a 1/2 teaspoon or so of the jam into the depression in each cookie; a tiny espresso spoon works well for the task.  Don't skimp on the jam, but don't get carried away, either, as the jam will melt and run during the baking. Return the sheets to the oven, switching the location of the baking sheets to ensure even browning.  Bake the cookies for another 5-8 minutes, until the cookies are evenly golden all over and the jam has melted into a pool.

Cool on the pan, then remove and store in an airtight container.  These will keep for a week or more (theoretically - they don't tend to stick around long!)  However, they are at their very tastiest when they are very fresh.

* If you are going to use apricot jam, it really needs to be homemade; commercial sugar-free raspberry jam is pretty good, but commercial sugar-free apricot jam just tastes like... nothing at all. The Foodier Than Thou recipe for  Tangy Sugar-Free Apricot Jam is awesome! Make a bunch when the apricots are ripe, and you will be all set for the year.

Tuesday, October 4, 2011

Gluten-Free (Super High Protein) Peanut Butter Cookies

Gluten-Free Peanut Butter Cookies


My dear friend Nina has suddenly been forced to go gluten-free, and she reports that virtually all of the gluten-free commercial products she's tried are dreadful.  Frankly, I don't know what I'd do if I had to go gluten-free in addition to having to go low-carb; using vital wheat gluten is a - well, vital aspect of my low-carb, high protein baking strategy!

However, as I prepared to make her a yummy treat and looked over other people's gluten-free recipes out there, I realized that a large number of my recipes could be easily adapted to be gluten-free; I've already replaced most of the gluten-laden ingredients with protein, so it wouldn't be hard to just replace the rest with a gluten-free flour.

Frankly, these peanut butter cookies are amazing.  Let me say that again:  these cookies are FREAKING AMAZING.  Party on, gluten-free friends!


Gluten Free (Super High Protein) Peanut Butter Cookies
Dough Balls
makes about 26 cookies

1 1/2 cups creamy, unsweetened, salted organic peanut butter (not "natural")
1 stick salted or unsalted butter, (4 ounces) softened

1 large egg
2 TB applesauce
2 tsp vanilla

1 cup dark brown sugar

OR:
1/4 cup plus 2 TB xylitol
1/2 cup erythritol
7 tiny scoops stevia
1/4 cup + 2 TB coconut palm sugar, or 1/4 cup brown sugar


3 TB flax meal
6 TB soy protein powder
2 TB unsweetened whey powder
3 TB almond meal
3/4 cup gluten-free flour baking mix
1 tsp baking powder
1/2 tsp salt
1/2 tsp xanthan gum

optional, but recommended: 6-8 ounces chocolate bars, either sugar-free or not, broken into big chunks, or jam of your choice (strawberry is especially yummy with peanut butter)


1. preheat the oven to 350 degrees F

2. If using my special sugar-free sweetener blend, in a small bowl, measure all the sweeteners and whisk to combine.

3. Measure the protein powder, whey powder, flax meal, and almond meal and put into a medium sized bowl. Using the "spoon and sweep" method (spoon the flour loosely into the cup until full, then scrape off excess with a knife) measure the flour and add to the other flours. Add the salt, baking powder, and xanthan gum and whisk to combine.

4. Place the peanut butter and butter in a mixing bowl and cream until it is very smooth, scraping down the sides of the bowl periodically.  (I use the paddle attachment.)

5. With a spatula, scrape down the sides of the bowl. Add the egg, vanilla and applesauce and mix until just combined.

6. Scrape down the sides of the bowl and add the sugar or sweeteners, process until well combined.

7. Scrape down the sides again and add the dry ingredients to the wet ingredients, mixing until well combined, scraping down the sides of the bowl to make sure it is all incorporated. You will have a very dense dough.

8. Using your hands or a spoon, make balls of dough and place them about 1 1/2" apart on the cookie sheet. You can make the cookies as big or small as you like (Don't worry, they don't run at all.) You can fit 12 to 15 medium-sized cookies on a sheet pretty easily. Using a fork, carefully press the balls flat from both directions, leaving the characteristic crosshatch mark on the surface, OR press with your thumb to make an indentation to hold the jam or chocolate.  If the dough balls break apart, just squeeze them back together with your fingers.

9. Place the optional - but highly desirable - chocolate on the surface of each cookie, or a scant 1/2 teaspoon of jam. (The jam can melt and run, so don't get carried away.)

10. Bake the cookies until they are just golden underneath, and slightly puffed, 12 to 15 minutes or so. Using a spatula, put on a rack until cool (or cool on the cookie sheet). Repeat until you have baked all of the dough.

Tuesday, June 14, 2011

High Protein (Low Carbohydrate) Bread

High Protein, Low Carb Bread with Sugar-Free Strawberry Jam


With that first batch of ultra-delicious sugar-free strawberry jam that solved my "boo-hoo, no more jam for me" moment, (also fig jam and raspberry jam) I inadvertently created a new boo-hoo moment. Because, of course, jam must go on something, and the item it seems best designed to go on is bread. And even the 100% whole grain, organic lovely stuff I've been buying at the Vital Vittles bakery up the street from us (day old - $2.50 a loaf!) has plenty of carbohydrates. Sure, I can pile on the jam, but one piece of bread a day? Only open faced sandwiches? Humph.

Fortunately, the boo-hoo bread moment went by as quickly as the boo-hoo jam moment; like the little red hen, I knew I would have to make some myself.

How do you make low-carbohydrate bread? I mean, bread means flour means carbohydrates, right? Well, I've been practicing by substituting out 50% of the flour in my quick-breads (banana, sweet potato, apple sauce) with an array of proteins, and I realized that I had what I needed right in my freezer drawer. I dusted off my bread machine ($15 at Salvation Army) got out some bread recipes, and got to work. The first try, where I substituted 50% of the flour with protein, was very good. But as usual, I wanted to push the envelope; how much protein could I substitute in before it stopped being bread? Version II, which left just 1/2 a cup of whole wheat flour, was fantastic - way better even than the bread I used to make with flour; more tender and chewy, rather than the crumbly dense stuff you get with whole grain. Protein-packed, but still full of fiber, plus the goodness of the Omega three fatty acids flax seeds bring to the party. Peanut butter and jam sandwiches, here we come!

High Protein (Low Carbohydrate) Bread

Makes 1 large loaf; 1 pound 11 ounces

Special Equipment: A large capacity bread machine

Bring all your ingredients to room temperature:

Lowest Carb Version

1 TB regular yeast
1/2 cup psyllium husk fiber (available at health food stores in the bulk aisle)

1/2 cup flax meal - packed (Bob's Redmill is available at Trader Joe's)
1/4 cup whey protein concentrate (unsweetened, unflavored) Be careful - not whey powder, whey protein concentrate - lowest carb, highest protein)
1/2 cup almond meal - packed - (available at Trader Joe's)

3/4 cup vital wheat gluten (available at health food stores in the bulk aisle)
1/2 cup soy protein powder, hemp protein, or coconut flour

1 tsp salt
3 TB Agave nectar OR brown rice syrup
3 TB flax oil
approximately 1 3/4 - 2 cups water - more as needed

1/3 heaping cup sunflower, flax, poppy, or other edible seed or nuts

Put all the ingredients except for the seeds in the pan of your bread machine. Program the machine for the white bread cycle, light baking, and large size. The machine will go through two kneading cycles. If the machine complains, add a little more water. The texture of the dough should be VERY soft and spongy, maybe even a little sticky; when you prod it with your finger it should give easily, like a fat tummy. If it's a little moist, that's okay; the seeds will absorb some of the water. At the end of the first cycle, the machine will stop and give a beeping sound; add all but 1-2 TB of the seeds. At the end of the second kneading cycle, sprinkle on the rest of the seeds. (If you add them at the beginning they will be pulverized, if you add them all at the end, many of them will fall off.)

Let the machine do its thing, and in a few hours you will have truly delicious bread; bread so good that you will have to fight the rest of your family for it.

Notes from Christine: Why a bread machine? Frankly, I don't hold much truck with one-trick equipment; that might fly in one of those fantasy kitchens, but my un-remodeled 1920's kitchen has so little space in it, everything must earn its keep. But a few years ago, my mother and all my sisters went out and bought bread machines at thrift stores for $5-$20, and I was much taken with being able to have fresh delicious bread even in the middle of nowhere, so I went off to the thrift store, too. I keep it on the floor, under my worktable, behind the trashcan. It deserves the spot, now more than ever.

What's with the gluten? I keep reading about how gluten is bad for you.
Gluten is a protein which naturally occurs in wheat; gluten forms chains when it is exposed to warmth, water, and kneading. The chains are what give bread that characteristic chewiness. Some people have sensitivities or auto-immune reactions to gluten; this recipe is not for them. For most of us, gluten is not a problem at all.

Psyllium Husk Fiber  This stuff is insanely high in fiber and low in carbs. It is available in bulk in health food stores; here in Berkeley, I can get it at Berkeley Bowl or Berkeley Natural Grocer. It does absorb a LOT of water, and it takes a while to absorb it. When I make the bread, I use 1/2 cup of psyllium and the higher amount of water. At first it seems too wet, but after I've added the flax seeds, and by the time the kneading cycle is done, it's just the perfect consistency; spongy, springy, but not sticky.

Where do I get all this stuff? A really well-stocked grocery store or health food store carries all of this stuff. I bought all of it at Berkeley Bowl; Bob's Red Mill makes all of these products. Trader Joe's also sells almond and flax meal.

Why are you using agave nectar or brown rice syrup instead of a sugar-free sweetener? I like to cut carbs and sugar wherever I can, but yeast likes to eat the real thing! Choose a low-glycemic sweetener to make everyone happy. In fact, if the sweetener is too low in carbs, the bread turns out short and dense; I used coconut palm sugar for a little while there and it just didn't rise properly.

What if I'm a vegan?
The only animal product in here is the whey powder. You can easily substitute soy protein for that, instead.

What if I don't have a bread machine? Here are alternative directions:

Warm the water up to 105-115 degrees F, and pour it into a large bowl. Add the sweeteners and the yeast, and whisk to combine. In another bowl, whisk all of the flours and solids. Ad the flax oil to the water. Add the flours, and using either your hands, a wooden spoon, or a mixer paddle attachment, mix until everything is well incorporated. Add all but 1-2TB of the seeds to the dough. Switch to a dough hook if using a mixer, and knead for 10 minutes, or knead by hand until dough has become elastic. Oil the bowl to keep the dough from sticking, make a ball out of the dough, cover with a cloth, and let rise until it is doubled in size, about an hour. Punch down the dough, and shape into one large or two small loaves. If you have pans of the right size, use them. Otherwise, put the loaf on a baking sheet. Sprinkle with the remaining seeds. Cover with the towel and let rise until it is doubled again. When it is getting close to time, preheat the oven to 350 F. When it is doubled and the oven is pre-heated, uncover and bake the bread, about 45 minutes.

Ch-ch-ch-changes: If you visit this blog often to use the recipes, from time to time you may see a change. I am always experimenting with my recipes, trying to see how low I can go on the carbs, and how high I can go on the protein and fiber. As I improve it, I update the recipe.The latest (as of 1/22/14) is that I upped the amount of almond meal by 1/4 cup. I really can't believe how much tastier it is from the change - and it was plenty tasty before! That extra 1/4 cup of almond meal rendered the crust chewier and more satisfying, the center moist but not spongy, the flavor delicious. I just ate a slice with butter and sugar-free homemade jam - divine! The only problem is now it is so yummy I want to eat more of it.....


Nutritional Analysis:  Friends have been asking for this for a while - "how many carbs does this bread have?" And I really wanted to know, too. So I finally sat down and did the analysis; if you use ONLY the lowest carb options above: flax meal, psyllium husk, whey powder, etc., the results are phenomenal!  One loaf of bread weighs about 1 pound 14 ounces, and yields 13 very generous slices. How generous? One slice is enough for my breakfast, and back in the day I would have eaten two slices of regular bread.

1 slice of bread (2 1/2 ounces): 7 grams of protein, 4 grams of fiber, 9 net grams of carbohydrate, 1.75 grams of omega 3 fatty acids - just from the oil alone! 150 calories. Compare that to one 2 ounce slice of Vital Vittles Organic Flax-Seed Oat Bread: 4 grams of protein, 4 grams of fiber, 21 net grams of carbohydrate, 140 calories. And mind you, this is fabulous, ultra whole-grain stuff; not processed smoosh bread.