Showing posts with label low-glycemic. Show all posts

Friday, April 11, 2014

Creamy, Delicious, Low-Carb Cheesecake


For some time I have been enjoying the delicious, low-carb "breakfast" cheesecake I invented a while back; it's very yummy, and nice and easy to make. However, I really was missing the delightful contrast in texture and flavor you get from a classic graham cracker crumb crust cheesecake. For the life of me I couldn't think how to make something that would work.... make low carb, sugar free graham crackers, just so that I could make crumbs out of them? That didn't seem like a good idea. What to do, what to do?

I recently had a flash of inspiration..... what if I used almond meal, just straight up almond meal, but toasted it in a saute pan? Immediate smash hit!

This is so yummy, and really straight-forward and easy. You may have a little leftover "crumbs"; if so, they store well in the fridge for your next batch - which I predict you will be making very soon! However, they are quite tasty sprinkled on the top of the cheesecake, or even eaten straight up with a spoon.


PREHEAT OVEN TO 325 F

ALMOND MEAL "GRAHAM CRACKER" CRUST
 
almond meal before toasting

2 cups whole almond meal (I use Trader Joe's)

1 teaspoon stevia extract powder
1 tablespoon xylitol
2 tablespoons erythritol
1 tablespoon coconut palm sugar
1/4 tsp salt

2 tablespoons unsalted butter
2 tablespoons coconut oil

In a small bowl, whisk the sweeteners until well combined.

In a medium-sized skillet, toast the almond meal, stirring frequently to prevent scorching. When the almond meal is just lightly golden and fragrant, remove it from the heat. Be careful not to overcook the almond meal - it will continue to darken and toast in the hot pan even after you have removed it from the heat.

Whisk the sweeteners into the toasted almond meal until well-combined.

Finished Crust
Add the butter and coconut oil, using the residual heat from the pan to melt them. Stir until all is well-combined. Set aside.


CHEESECAKE FILLING


2 cups full-fat cottage cheese (full fat is the lowest in carbs)
1 cup full-fat cream cheese (lowest in carbs)
1/2 cup full-fat Greek yoghurt (lowest in carbs)
2 tsp pure vanilla extract
3 large eggs
1 tsp stevia
1 tablespoons xylitol
2 tablespoons erythritol
3 tablespoons coconut palm sugar

Bring all of the ingredients to room temperature.

In a small bowl, whisk together the sweeteners until well-combined.

Using an immersion blender, blender or food processor,  process the cottage cheese until smooth. Add the cream cheese, yoghurt and vanilla and process until smooth. Add the eggs and sweeteners and process until smooth.


PUT THEM ALL TOGETHER

Using your ramekin collection, put 2-4 tablespoons of the "graham cracker crust" mix in the bottom of each cup, depending on the size of the vessel and your taste. Press the crumbs down using the back of a spoon.


Spoon the filling on top of the crumb crust. The number of ramekins you make depends on the size of the ramekin and how much of the crumb mixture is in it.

When you have used all of the filling up, put them into a large roasting pan, and carefully pour boiling water all around them.


Place into your pre-heated, 325 F oven and bake until firm, around 45 minutes to 1 hour.

Devour!


Thursday, May 17, 2012

Sugar-Free (Low-Carb) Linzertorte

Sugar-Free Linzertorte


Mmmm.... Linzertorte. I can't think of anything tastier just now. But perhaps you are wondering what it is? Linzertorte is a classic Viennese pastry; a rich, buttery dough with lots of toasted ground hazelnuts, pressed into a tart pan, topped with raspberry jam, and then criss-crossed with a lattice of more of the dough. The rich dough balances the sweetness of the jam, the tart sweetness of the jam does the same for the dough.  This recipe calls for lemon zest in the dough, which adds yet another layer of contrast and brightness.  Oh my.

Another beauty of Linzertorte is that it is very easy to make, but looks and tastes like you had to go to culinary academy to master it.  Love it! Make this the next time you really want to impress your guests.... or when you just want a really good treat.


Sugar-Free (Low-Carb) Linzertorte
Toasted Hazelnuts

6 1/2 ounces of hazelnuts
1 3/4 sticks unsalted butter, softened
3 large egg yolks
1 tsp apple sauce
1 TB finely grated lemon zest

1/4 cup erythritol
2 1/2 TB xylitol
4 scoops stevia

Dough Strips
1/4 tsp salt
1 1/4 cups whole wheat pasty flour
1/4 cup + 2 TB almond meal
1/4 cup + 2 TB soy protein

1 1/3 cups sugar-free raspberry jam

Equipment: a 9" tart pan (or springform)
A food processor or grinder for the nuts
A mixer

1. Toast and skin the hazelnuts.  (Spread them on a baking sheet in a pre-heated, 350 F oven. Toast for about 10 minutes, until they are golden and aromatic. Cool them. A few handfuls at a time, put them in a tea towel and rub them together to rub off the skins.)  Discard the skins.

2. In a food processor, grind the hazelnuts until they are a fine meal - but be careful not to turn them into nut butter.

3. In a small bowl, combine the sweeteners and whisk to combine well.

4. Measure the various flours, nut meals and salt into a medium bowl; use the "spoon and sweep" method to measure the whole wheat pastry flour (spoon the flour into the dry measuring cup, sweep off the excess with the back of a knife. This ensures that you don't accidentally use compacted flour, which throws off the proportions.)  Whisk to combine.

5. Using your mixer, cream the butter and sweeteners together at high speed until light and fluffy.  Add the applesauce, then add one egg yolk at a time and beat just to combine. Add zest and beat until just combined.

6. Beat in the flour/nut meal mixture until well combined. The dough will be stiff.

7. Take the dough out of the bowl and divide into two even balls. Wrap them in waxed paper and press into disks. Refrigerate for about 1/2 hour; if much longer, you will need to soften the dough up a bit to work it. (You can make the recipe up to this point a day in advance; just allow enough time for the dough to soften.)

8. Remove the dough from the refrigerator. Preheat the oven to 375 F.

9. Place one disk of dough in the bottom of the 9" tart pan.  Using your fingers (and perhaps the back of a wooden spoon) press the dough evenly all over the base of the pan and all the way up the sides. Add the jam and smooth it over the bottom.

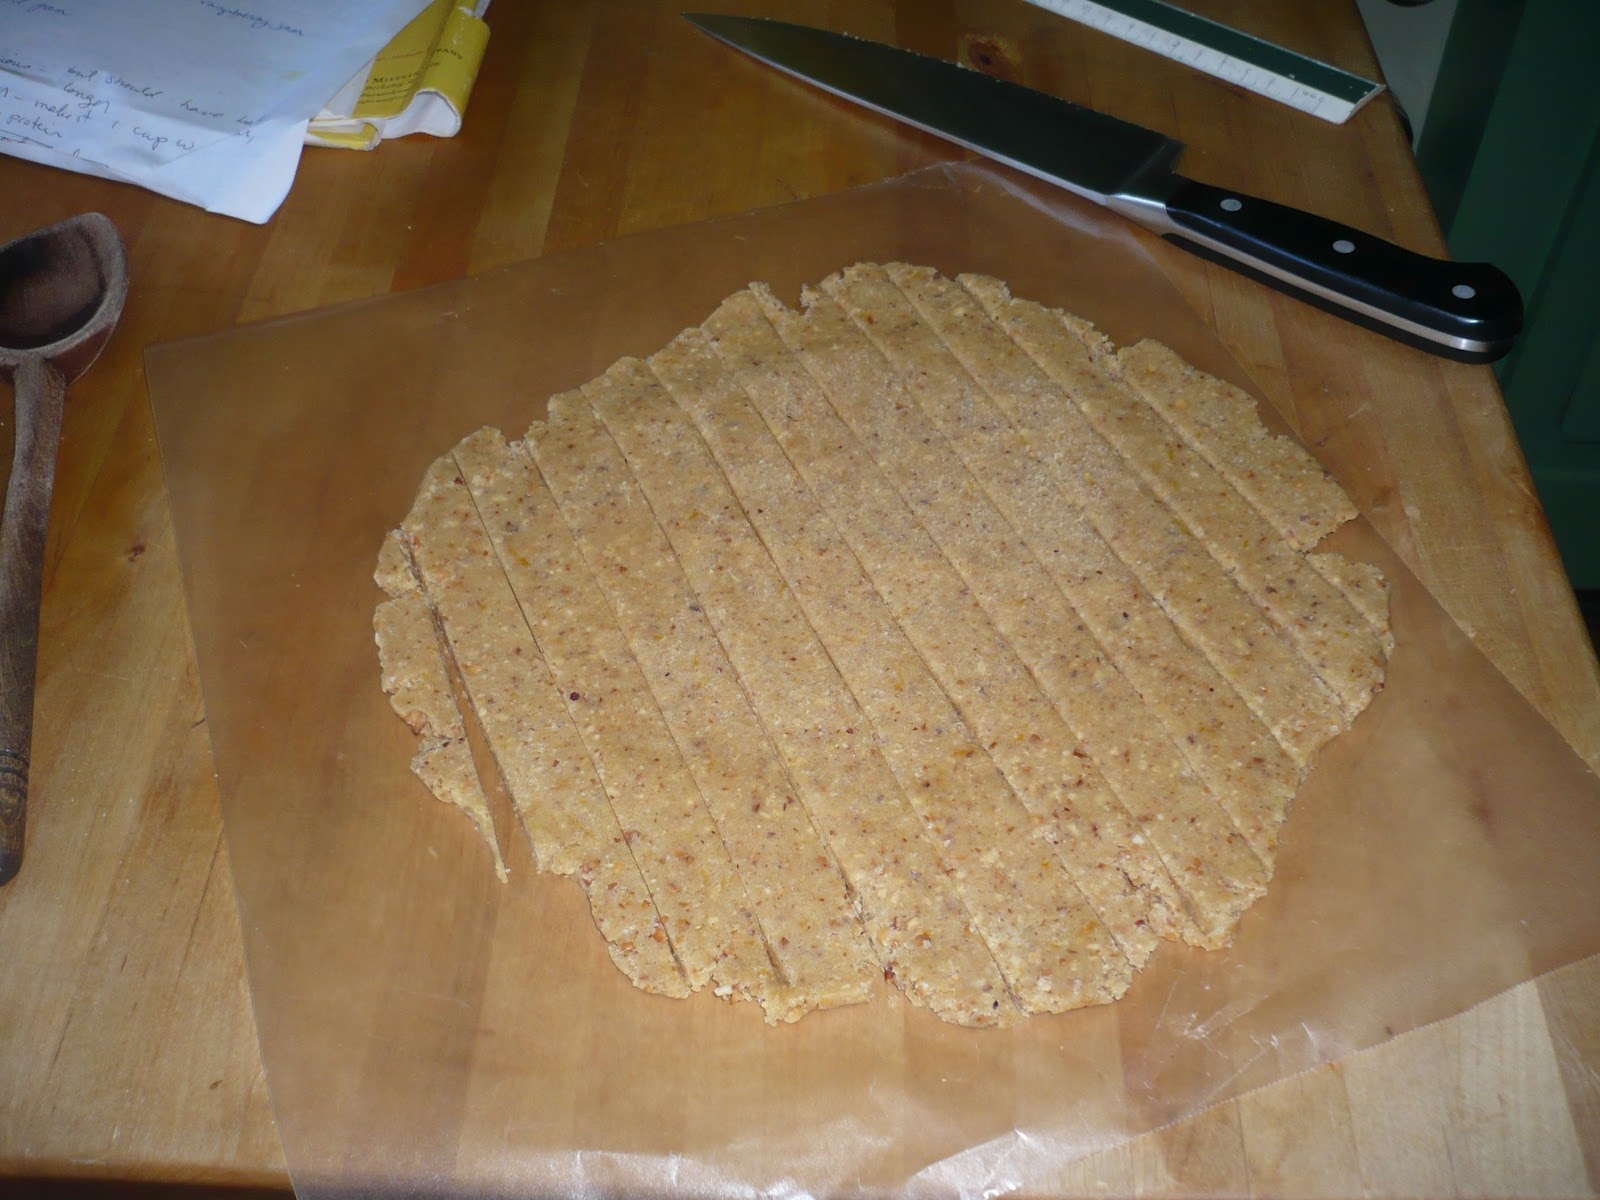
10. Take the second disc of dough and place it between two sheets of wax paper. Roll it into an even circle that is slightly bigger than the 9" pan.  Slice the circle into strips 1/2" wide. Transfer half of the strips one at a time to the top of the tart, arranging the strips 1" apart from each other, and pinching the ends onto the sides of the bottom dough. (This takes a little planning; remember that you will need the longest strip for the center, and that you will need to match it going the other way - don't use up the long ones on the short sections!) Turn the tart sideways and repeat going the other way, making a simple cross lattice.  Pinch all of the ends, or use a fork, to attach the strips to the sides of the dough.
Finished tart before it goes in the oven


11.  Place the tart on a baking sheet and put it in the lower center of the pre-heated oven.  Bake until quite golden, about 30 minutes.  Remove from the oven, cool on a rack for an hour  or more, then carefully push the bottom plate up through the center ring to remove the side ring of the pan. Place the tart on a large plate.

12. Slice in very small pieces, as this is very rich.  Lovely with coffee, delicious for dessert, afternoon tea, or even breakfast. (Yum.)

Notes: Jam - you can make your own sugar-free raspberry jam, as I did.  Or, you can buy a pretty good xylitol sweetened jam made by Nature's Hollow, which I found at our local natural foods store.  Xylitol USA also offers a decent version, also sweetened with xylitol, and sold through their website.


Friday, September 30, 2011

Sugar-Free Tomato Chipotle Ketchup

Tasty Burger with Sugar-Free Chipotle Ketchup and a dollop of mayo


As our daughter squirted a nice big blob of ketchup on her hamburger at dinner the other night, she remarked with satisfaction that "ketchup made everything taste better."  Well, that's pretty accurate.  It certainly enhances the savory, salty flavors of meat.  A nice big dollop on top of a burger or hotdog - good stuff.  Eaten in sufficient quantities on tater tots or fries to be considered a vegetable in its own right?  Yeah.  Sounds good!


Of course, ketchup is pretty much off limits to those who lead a sugar-free life, so I set out to make a new recipe for it.  The fries and tater tots - well, sadly, that's never going to happen.  But we can say "heck yeah!" to burgers and hotdogs.

This recipe offers the sweet, spicy, vinegary notes that are the hallmarks of ketchup, with the additional complex smoky spice of chipotle.  It lasts for months in the refrigerator, so it's ready any time you are for a meaty treat.

Sugar-Free Tomato Chipotle Ketchup

1 @32 ounce can tomatoes in puree (use good quality tomatoes - it really makes a difference here)

2 TB olive oil
1 large onion
2 cloves garlic

1/2 tsp salt
1/2 cup cider vinegar
1 chipotle en adobo
1/3 cup erythritol
1/4 cup xylitol
5 tiny scoops stevia
1 TB tomato paste
1 stick cinnamon

1. Puree the tomatoes with an immersion blender or regular blender

2.  In a heavy sauce pan, heat the olive oil, then cook the onion and garlic until they are softened

3.  Stir in the remaining ingredients, including the pureed tomatoes.  Bring to a boil over medium heat, then lower the heat and simmer, stirring with increasing frequency, until very thick, about an hour.

4.  Remove the cinnamon stick and let the mixture cool.

5.  Puree the ketchup again.

6.  Store in the refrigerator or freezer; it's good for a few months.

Sunday, September 18, 2011

Sugar-Free Raspberry Jam

Sugar-Free Raspberry Jam in a Sugar-Free, Low-Carb Linzertorte
                                  
 
Red raspberry jam is such a lovely treat on toast.  It is also a vital component in the classic Austrian pastry called Linzertorte.  

I had a yen for Linzertorte, so I decided to splurge and make a small batch of raspberry jam.  The jam was delicious.  The resulting Linzertorte was amazing - and with one torte the jam was all gone!  Of course, I had to make more jam so I could make more Linzertorte...

The Linzertorte recipe will follow, after I've had a chance to make another one and perfect the recipe.  Meanwhile, summer is here - we'd better make the jam while we can!


As always, check the proportions in your low-sugar pectin package; I used Pomona Pectin, an apple derived pectin made especially for low-sugar or sugar-free jam.

Sugar-Free Raspberry Jam

4 1/2  cups mashed organic red raspberries (about 8 small baskets)
2 1/4 tsp calcium water (Pomona Pectin - an activator for the pectin)

2 1/4 tsp low-sugar pectin
1 1/4 cup erythritol+ 2 TB
2/3 cup xylitol
14 tiny scoops stevia powder

yield:  2 pint jars plus 3 half pint jars

1. If the jars are brand new, wash them and the rings and lids to remove any chemicals left from processing. If they have been sitting in the basement, check them for dust, and wash off any you find. Put the jars and rings into a stockpot or canning pot and fill with hot water to cover by an inch or two. Put them on the rear burner of the stove over high heat and bring them to a boil. When they come to a boil, turn the heat down and keep them hot and ready.  Be sure to scald the wide-mouthed funnel and ladle, too. 

2.  Following the instructions in your low sugar pectin kit, make calcium water. (I use Pomona brand.)


3.  Pick over the berries and remove any that are moldy.  Put the rest into a large measuring cup, and mash them well.  Use the amount of mashed fruit you have to determine how much calcium water, pectin, and sweeteners to use. 

4.  Put the raspberries and calcium water into a saucepan big enough to comfortably accommodate the whole batch.  Don't fill the pan too close to the top.  Bring the fruit to a boil over medium low heat, stirring frequently to prevent scorching.

5.  Meanwhile, measure the sweeteners and the pectin into a medium sized bowl and whisk them all well to combine.

6.  When the fruit comes to a full boil, get a long-handled wooden spoon ready, and gradually add the sweetener mix to the hot fruit, stirring constantly as you pour in the sweeteners. Stir well and frequently to dissolve the pectin and sweeteners and prevent lumping. Bring it back to a full boil. When it looks lovely and thick, turn off the heat and get ready to can. (Don't worry if it isn't as thick as jam; it thickens as it cools.)

7.  Clear a good sized work surface near the stove, and cover it with clean dishtowels (preferably ones you don't care about!)

Turn the heat off under the pot of jars and move it to the front of the stove so you can reach them easily, and move the jam to the back of the stove so you don't get water into it by accident. (Put the lid on the pot if necessary.) Using tongs or a jar lifter in your dominant hand, and a clean dishtowel in your other hand, carefully remove the lids and rings and drain them on the towels. Lift each jar out of the hot water, dump the hot water back into the pot, and carefully guide and transport the hot jar over to the towels. Turn it upside down to drain out the extra water. Repeat until all of the jars are drained and ready.

Turn the heat back on high underneath the pot that the jars came out of, and bring it back to a full boil while you can the jam.

Now, again using your tongs (or a clean towel, oven mitts, or tough hands!) turn the jars right side up, and line them up to be ready to fill. If you have a wide-mouthed jar funnel (which I so highly recommend - available at any good hardware store, Bed Bath and Beyond, well stocked grocery stores, etc., for less than $5) put it on top of one of the jars.

Grab your best ladle, and bring the pot of hot jam over to your work surface. Carefully fill each jar, leaving 1/4" of space at the top. If you have a wide-mouthed funnel, the bottom should come to just the right spot. If you don't, do your best! If necessary, spoon some out to reach the right level. After you have filled all your jars, use a clean, moist towel to wipe the ring area and the top surface of the jars clean. If you have less than a full jar of jam, put that one straight into use and don't bother to can it.

Put the lids on, followed by the screw tops, and screw them down.

 8.  Bring the pot of water back to a full boil, and carefully return the full jars of jam to the pot.  You may have to remove some of the water, as full jars displace more water than empty ones.  Bring the water back to the boil again, and boil for 10 minutes.

9.  Remove the jars and let them cool on the towels.


Notes from Christine:

"What's with all of these obscure sweeteners?" Erythritol and Xylitol are sugar alcohols; super low-glycemic, super low-calorie, super low-carbohydrate, and good for your teeth.  

Xylitol is a little sweeter than cane sugar, has a fairly neutral flavor with a little bright, almost pepperminty quality, and can be found easily at a well-stocked health food store or really good grocery store.

Erythritol, very neutral in flavor, is about 60% as sweet as sugar, and is very difficult to find in stores, except in individual packets. As it is 60% as sweet as sugar, it takes quite a bit more to reach the right level of sweetness in a recipe, and this makes proportions difficult.  However, its very neutral profile makes it a natural for blending with xylitol and stevia, especially since stevia is so highly concentrated.  It's worth tracking it down by mail-order, or you could make a special request to a grocer to order some for you.

Stevia is a natural, calorie-free leaf extract, super concentrated and very sweet, but with a weird, bitter aftertaste and no volume; due to its highly concentrated state, one teeny-tiny scoopful (which comes in its container) is equal to a teaspoon of sugar. It is easily purchased at Trader Joe's or any grocery store.

Be aware that some Xylitol and Erythritol brands in American packaging are actually imported from China and repackaged. That is why I buy all of these directly from Xylitol USA, http://www.xylitolusa.com/ which manufactures them from North American sources.

Friday, July 22, 2011

Mocha Coconut Milk Ice Cream


Ice cream. Ahhh. What is more delicious on a sunny afternoon? I can't think of anything off the top of my head, frankly.

This chocolate coconut milk ice cream, featuring the gorgeous caramel notes of coconut palm sugar, is rich, creamy, smooth, just sweet enough.... oh, baby! Then come its hidden virtues: low-carb, low-glycemic, vegan, and lactose-free. This recipe can be enjoyed by just about anyone. Your mouth will have trouble believing that this is a healthy treat!


Mocha Coconut Milk Ice Cream
makes approximately 1 quart

2 cans full fat coconut milk (14 oz each)
1/2 cup unsweetened cocoa powder
2 pinches salt
1 cup plus 2 tsp Coconut Palm Sugar
1 cup fresh brewed espresso; decaf or caffeinated (2 double espressos) or best quality, fresh brewed, VERY strong coffee

Toppings: Toasted unsweetened coconut curls, and/or toasted almond pieces

Tools: a blender, immersion blender or food processor
an ice cream maker

Combine all of the ingredients, and using either an immersion blender, blender, or food processor, process briefly to combine and emulsify the ingredients. (I swear by my immersion blender.) Place the mixture in the refrigerator and chill until completely cold.

Following your ice cream maker's instructions, pour the mix into the bowl of the ice cream maker and churn until it reaches the consistency of soft-serve ice cream. (If you have too much ice cream mix to fit in the maker, set it aside to freeze as a second batch. The ice cream freezes so fast that even a low-tech ice cream maker like my ancient Donvier stays cold enough to freeze the extra mix.)

Unlike ice cream made with dairy products, coconut milk freezes VERY fast and VERY hard, and is at its most luscious creamy state of goodness when it is softer than dairy ice cream. Therefore, it is best to serve it right away, rather than freeze it and serve it later. Since it comes together so fast, you can have everything ready and then make it just before serving. Or, if you wish to freeze it, be sure to allow ample time for it to soften; far more than you would for dairy ice cream. This is one ice cream that could probably make it safely to a party in a hot car!

The ice cream is delicious on its own, but topping it with toasted coconut curls and/or almond slices makes it even more divine.

Notes: if you don't have a blending tool, this can be made with a whisk. The coconut palm sugar dissolves very quickly, but the cocoa powder tends to clump. You may wish to put the cocoa through a sieve if you are using this method.

Coconut Milk:
you can use light coconut milk, but it just won't be as good.

Thursday, April 28, 2011

Oven-Baked Sweet Potato Fries


We were heading off to Lake Tahoe for our annual Ager Family ski trip, and planning out the menu and shopping list. Every year, Joel and I go to the Truckee Safeway and buy about a hundred dollars worth of rib-eye steaks to barbecue, roast a bunch of russet potatoes, and make a big salad. But this year, there would be no baked potatoes for "Atkins Girl"; amazingly, potatoes are higher on the glycemic index than pure sugar - go figure! Burgers and Fries, no more. Sigh. Then I remembered: Sweet Potato Fries! Yay! I can have those! As I have gone on and on about before, sweet potatoes, despite their tasty, sweet nature, are low on the glycemic index, meaning that your body digests them into blood sugar slowly. Plus, they are PACKED with nutrients. And best of all, they are DELICIOUS. Bring 'em on!

So, dinner time came around. Best steaks ever. Plenty of baked potatoes (for everybody else) and I made a batch of sweet potato fries; guess which ones were wiped out?

Oven-Baked Sweet Potato Fries

* 2 pounds orange sweet potatoes (aka yams) about 3 large ones
* olive oil (about 1/4 cup)
* 1 Tbsp salt
* 1-2 Tbsp spice, spice blend, or spice combination of your choice: cumin, za'atar, chipotle powder, smoked paprika, Chinese five-spice, garam masala, cayenne, black pepper, cinnamon, chiles, Cajun seasoning, etc.

Pre-heat the oven to 450 F

Wash, dry, and trim off the ends of the potatoes, and remove any obvious blemishes.

Cut the potatoes in half lengthwise, then, laying the flat side down, cut each half into 4-8 wedges, depending on how big the potato is. The thinner the wedge, the more crispy it will be. If you like them more soft, make them bigger. If they are really long, cut them in half crosswise as well.

Put the wedges in a large bowl and drizzle them with the olive oil, then, using tongs, toss well to coat. Sprinkle them all over with the salt and spices, and toss well again until the seasoning coats the the wedges evenly.

Lay the wedges in a single layer on a large baking dish, being careful not to crowd too much. (If you crowd them, they won't brown as well, and will be more squishy than fry-like). If it is overly crowded, add a second pan.

Bake them for about 15-20 minutes, then, using a spatula, turn them all over. Return to the oven for another 15 or so minutes. When they are golden brown and tender, they are ready.