Thursday, May 17, 2012

Sugar-Free (Low-Carb) Linzertorte

Sugar-Free Linzertorte


Mmmm.... Linzertorte. I can't think of anything tastier just now. But perhaps you are wondering what it is? Linzertorte is a classic Viennese pastry; a rich, buttery dough with lots of toasted ground hazelnuts, pressed into a tart pan, topped with raspberry jam, and then criss-crossed with a lattice of more of the dough. The rich dough balances the sweetness of the jam, the tart sweetness of the jam does the same for the dough.  This recipe calls for lemon zest in the dough, which adds yet another layer of contrast and brightness.  Oh my.

Another beauty of Linzertorte is that it is very easy to make, but looks and tastes like you had to go to culinary academy to master it.  Love it! Make this the next time you really want to impress your guests.... or when you just want a really good treat.


Sugar-Free (Low-Carb) Linzertorte
Toasted Hazelnuts

6 1/2 ounces of hazelnuts
1 3/4 sticks unsalted butter, softened
3 large egg yolks
1 tsp apple sauce
1 TB finely grated lemon zest

1/4 cup erythritol
2 1/2 TB xylitol
4 scoops stevia
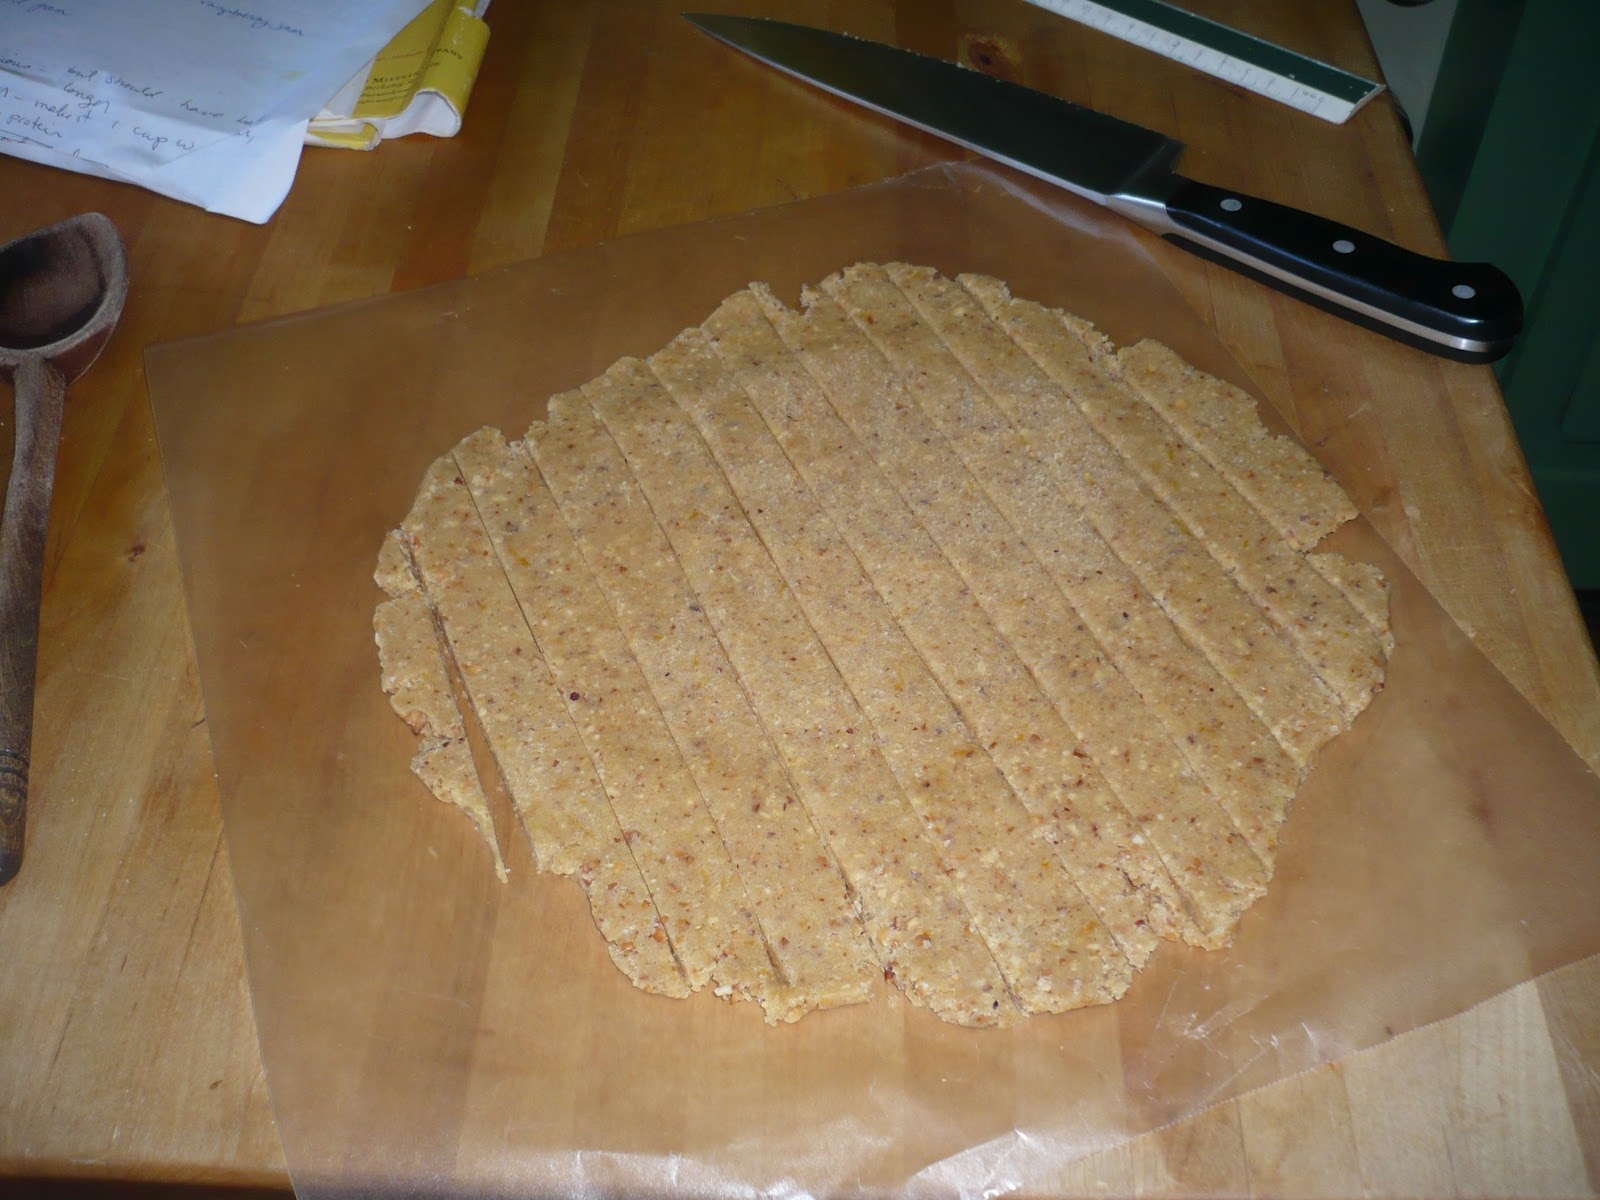
Dough Strips
1/4 tsp salt
1 1/4 cups whole wheat pasty flour
1/4 cup + 2 TB almond meal
1/4 cup + 2 TB soy protein

1 1/3 cups sugar-free raspberry jam

Equipment: a 9" tart pan (or springform)
A food processor or grinder for the nuts
A mixer

1. Toast and skin the hazelnuts.  (Spread them on a baking sheet in a pre-heated, 350 F oven. Toast for about 10 minutes, until they are golden and aromatic. Cool them. A few handfuls at a time, put them in a tea towel and rub them together to rub off the skins.)  Discard the skins.

2. In a food processor, grind the hazelnuts until they are a fine meal - but be careful not to turn them into nut butter.

3. In a small bowl, combine the sweeteners and whisk to combine well.

4. Measure the various flours, nut meals and salt into a medium bowl; use the "spoon and sweep" method to measure the whole wheat pastry flour (spoon the flour into the dry measuring cup, sweep off the excess with the back of a knife. This ensures that you don't accidentally use compacted flour, which throws off the proportions.)  Whisk to combine.

5. Using your mixer, cream the butter and sweeteners together at high speed until light and fluffy.  Add the applesauce, then add one egg yolk at a time and beat just to combine. Add zest and beat until just combined.

6. Beat in the flour/nut meal mixture until well combined. The dough will be stiff.

7. Take the dough out of the bowl and divide into two even balls. Wrap them in waxed paper and press into disks. Refrigerate for about 1/2 hour; if much longer, you will need to soften the dough up a bit to work it. (You can make the recipe up to this point a day in advance; just allow enough time for the dough to soften.)

8. Remove the dough from the refrigerator. Preheat the oven to 375 F.

9. Place one disk of dough in the bottom of the 9" tart pan.  Using your fingers (and perhaps the back of a wooden spoon) press the dough evenly all over the base of the pan and all the way up the sides. Add the jam and smooth it over the bottom.

10. Take the second disc of dough and place it between two sheets of wax paper. Roll it into an even circle that is slightly bigger than the 9" pan.  Slice the circle into strips 1/2" wide. Transfer half of the strips one at a time to the top of the tart, arranging the strips 1" apart from each other, and pinching the ends onto the sides of the bottom dough. (This takes a little planning; remember that you will need the longest strip for the center, and that you will need to match it going the other way - don't use up the long ones on the short sections!) Turn the tart sideways and repeat going the other way, making a simple cross lattice.  Pinch all of the ends, or use a fork, to attach the strips to the sides of the dough.
Finished tart before it goes in the oven


11.  Place the tart on a baking sheet and put it in the lower center of the pre-heated oven.  Bake until quite golden, about 30 minutes.  Remove from the oven, cool on a rack for an hour  or more, then carefully push the bottom plate up through the center ring to remove the side ring of the pan. Place the tart on a large plate.

12. Slice in very small pieces, as this is very rich.  Lovely with coffee, delicious for dessert, afternoon tea, or even breakfast. (Yum.)

Notes: Jam - you can make your own sugar-free raspberry jam, as I did.  Or, you can buy a pretty good xylitol sweetened jam made by Nature's Hollow, which I found at our local natural foods store.  Xylitol USA also offers a decent version, also sweetened with xylitol, and sold through their website.


Monday, April 30, 2012

Jack's Artemesia Manhattans

Jack's Artemesia Blood Orange Manhattan, aka "New Jack City"


Some months back, my friend Jack Coates e-mailed me a cocktail recipe he'd dreamed up using my organic Artemesia Kumquat liqueur; it was a new version of a classic - the Manhattan.

Well, I kept meaning to try it, but I didn't have sweet vermouth on hand.  Well, I have some now!  Last night I decided to shake one up.... oh, Jack!  That was sooo much tastier than the Manhattans Joel and I had in a hip all-night bar in Manhattan we went to with our New Yorker friends Kelly and Mo.  Now I'm a believer - in Manhattans! 

Then, last night he invented a new variation on it - this one with Artemesia Blood Orange Liqueur.  I haven't tried it yet, but it sounds just as fab.  Jack Coates - you, my friend, are a talented mixmaster.

I guess I'd better get that recipe right on out to you.

Jack's Artemesia Kumquat Manhattan

2 oz bourbon
1 oz dry vermouth
1 oz sweet vermouth
1/2 oz Artemesia Organic Kumquat Liqueur
Dash of bitters
Maraschino cherry (a REAL one.)
1 Lemon peel, bruised

Measure all of the liquids into your shaker, add ice. Shake well until chilled, pour. Garnish with the lemon peel and cherry.

Jack's Artemesia Blood Orange Manhattan (New Jack City)

2 oz bourbon (maker's mark)
1 oz dry vermouth (vya)

1 oz Artemesia Organic Blood Orange Liqueur
dash of bitters
orange peel
Maraschino cherry (a REAL one)

Measure all of the liquids into your shaker, add ice. Shake well until chilled, pour. Garnish with the orange peel and cherry.

Individual (Sugar-Free) Chocolate Lava Cake

Oops - we ate half of it before I remembered to photograph it!


So I was reading Sunset Magazine while on the cross-trainer at the Y when I came across this delicious sounding recipe from another food blogger, Joy Wilson.  Of course, I immediately started thinking about how to make a sugar-free version.... and then a gluten-free version... and then a sugar-free, gluten-free version. Sadly, my dear friend Nina is gone now (if you think you may have a gluten allergy, please please PLEASE get it checked out) but I still dabble a bit in gluten free recipes, as there is such a demand for them.

This recipe is an immediate, delicious, sure-fire winner.  As written, it makes one cake, but it can easily be adapted to make as many as you like.  While testing the recipe I made them two at a time, in different versions so I could speed up my recipe testing.

Individual Chocolate Lava Peanut Butter Cake
adapted from Joy the Baker

I.
 1/2 tsp butter
1 tsp unsweetened cocoa powder

II.
1 TB unsalted butter
1 1/4 oz sugar-free, sweetened chocolate, broken into chunks (the best quality you can find)
1-2 TB smooth, salted, sugar-free "natural" peanut butter OR 1 TB bourbon

chocolate, butter and peanut butter
III.
3 tsp erythritol
1 tsp xylitol
3 tiny scoops stevia extract powder
1 generous pinch salt

IV.
1 large egg
1 tsp flour, OR 1 tsp gluten-free mix OR 1 tsp unsweetened cocoa powder


1.  Preheat the oven to 375 F.  Grease a 3/4 cup capacity ramekin with the 1/2 tsp of butter - feel free to use your fingers.  Sprinkle in the tsp of cocoa powder and shake it around to coat all of the surfaces.

2.  In a small heat-proof bowl, place the 1 TB butter and 1 1/4 ounces sweetened, sugar-free chocolate.  Put the bowl in a microwave, blast for a few seconds, check the contents. If it's beginning to melt, stir it up, and continue to blast, check, and stir until it is all melted. Stir until well combined.  Now stir in the peanut butter or bourbon.  You get to choose how peanut-buttery you want it to be.

3.  In another small bowl, combine all of the sweeteners and stir well to blend.  Add the sweeteners to the melted chocolate mix and stir well to combine.

4.  In the small bowl you just used, whisk the egg until well-combined.  Add the egg, tsp of flour/cocoa/gluten-free mix and pinch of salt to the melted chocolate mix. Stir well to combine.

5. Using a small spatula, scrape the mix into the buttered ramekin and smooth the surface.  Bake the cake on a baking sheet for about 12 minutes, until the rim is cake-y and the center is pudding-y.

6.  Cool for a couple of minutes, then run a knife around the edges to dislodge it from the ramekin onto your plate.  (Or just eat it out of the ramekin - why not?)  Eat it right away, while it's still all melt-y and good!

Batter ready for the oven.....


Sunday, April 22, 2012

Caramel Breakfast Cheesecake (Low-Carb, Low Sugar, High Protein)

Caramel Breakfast Cheesecake

Some months back, I posted a recipe for breakfast cheesecake, featuring orange or lemon zest.  Yum. Well, as I have gone on about at great length, I have been living the low-carb high-protein life for over a year now, with great health success.  And as I have been talking a lot about lately, I've been experimenting a lot with coconut palm sugar, the hot "new" low-glycemic sweetener.  As keeping carbohydrates as low as possible, not just preventing blood sugar spikes through the use of low-glycemic sweeteners, is important for my health success, I use this sugar sparingly.  However, just a spoonful or two of this delectable, caramel-y sugar brings huge amounts of flavor to a recipe.  I have been inspired to revisit my older recipes with this in mind.  Now, just a reminder: no need to just eat this for breakfast; how about lunch, snack or dessert? 

So, without further ado, a new variation on breakfast cheesecake.  I think it's divine.

Caramel Breakfast Cheesecake

2 cups (16 oz) full-fat cottage cheese or ricotta
1 cup (8 oz) whipped cream cheese
1/2 cup full fat Greek yogurt (Fage has the lowest carb content)

5 tiny scoops stevia powder
3 TB coconut palm sugar
2 TB xylitol
1/3 cup erythritol
3 large eggs 
2 tsp vanilla extract

Pre-heat the oven to 325 F, and put the kettle on to boil.

Place the cottage cheese in the bowl of your food processor and whir it until it is well-creamed.  (An immersion blender or blender would also work.) Scraped down the sides of the bowl with a spatula. Add the cream cheese and whir until they are both creamy and smooth.   Scraped down the sides of the bowl again. Add all of the sweeteners and process until well-combined, then scrape down the sides again.  Now add the eggs and vanilla and process until all are well combined.

Place your ramekin collection (you will need 6-10 of them, depending on size) in a high-sided roasting pan.  Pour the batter into the ramekins, using your spatula to get all the goodies into the pan.  (If you don't have ramekins, you can line a muffin tin with cupcake liners and use those.)  After the cups are full, carefully pour the boiling water around them. Place the pan in the center of the oven, and bake until the cakes have set,  around 40-45 minutes.  Cool, then cover and refrigerate until chilled.

Monday, April 9, 2012

Butterscotch Pudding with Coconut Palm Sugar

Butterscotch Pudding (with vanilla bean)


Several years ago, I bought a bag of something I had never seen before from the proprietors of Coracao Confections; it was coconut palm sugar, and they were using it in their amazing line of organic, raw, low-glycemic chocolates.  Well, coconut palm sugar is now all the rage.  Dr. Oz did a segment on it on his program, promoting it as part of a weight-loss strategy (the idea being that if you evened out the highs and lows of sugar, you wouldn't get so many cravings.)

I've been using this delicious, caramel-noted sweetener in a lot of my almost sugar-free recipes; just a few spoonfuls can bring wonderful flavor and texture to the mix, boosting the flavors and texture of my sweetener trio; erythritol, xylitol, and stevia.  I was inspired in the last few weeks to invent two new pudding recipes using coconut palm sugar.  Both of them are so delicious that, frankly, I blew my own mind.

The first one uses whole cow's milk.  The second one is vegan, and uses whole coconut milk.  Either way - me-OW, that's good eats!  Just be aware that once you get started, it's very hard to stop eating this yummy stuff.  But hey, milk is full of protein and calcium, and coconut milk is very good for your immune system, and either way, it's low carb and low glycemic!


Butterscotch Pudding with Coconut Palm Sugar

Version One:  Dairy
I.
1/2 cup coconut palm sugar
1/4 tsp salt
2 TB plus 1 tsp corn starch (or tapioca starch)

II.
1 1/2 cups whole milk
1/2 cup heavy cream

III.
2 TB unsalted butter
1 tsp vanilla extract

1. In a heavy, medium-sized sauce pan, whisk the sugar, salt and starch.

2. Whisk in the milk and heavy cream. Over medium heat, whisking/stirring constantly, bring the mixture to a full boil, and then cook for one minute.

3.  Add the butter and vanilla, and stir well to combine.  Cool, pour into a heat-proof container, and chill. If you wish to prevent a "skin" from forming, you can cover the pudding with a buttered round of wax or parchment paper.

Version Two: Coconut Milk (Vegan)

I.
1/2 cup coconut palm sugar
1/4 tsp salt
2 TB plus 1 tsp corn starch (or tapioca starch)

II.
1 can of full-fat coconut milk (14 ounces)

III.

1 tsp vanilla extract


1. In a heavy, medium-sized sauce pan, whisk the sugar, salt and starch.

2. Whisk in the coconut milk. Over medium heat, whisking/stirring constantly, bring the mixture to a full boil, and then cook for one minute.

3.  Add the vanilla, and stir well to combine.  Cool, pour into a heat-proof container, and chill. If you wish to prevent a "skin" from forming, you can cover the pudding with a greased round of wax or parchment paper.

Notes:  the pudding will thicken as it cools, so don't panic if it seems thin when you have finished cooking it.   If you are really feeling expansive, you can use half of a fresh vanilla bean instead of the vanilla extract.

Monday, March 26, 2012

(Sugar-Free, Low-Carb) Granola with Flax

Sugar-Free, Low-Carb Granola


As with so many of my low-carb creations, this new recipe was born one day when I was thinking wistfully about eating some of my yummy maple granola with flax. Or rather, thinking about how I couldn't eat it anymore, and yes, feeling a little sorry for myself.  Sniff. Sniff.  Isn't it interesting that inspiration is often born out of desperation?  I immediately thought about how I could make sugar-free, low-carb granola;  I would raise the amount of protein and lower the amount of carbohydrates by replacing a substantial percentage of the grains with nuts, seeds, and coconut.  (And coconut is good for the immune system, too!)  There was just one problem; what to use as a sweetener? 

I love using the sugar alcohols erythritol and xylitol; they are naturally low glycemic and low carbohydrate.  They even help prevent tooth decay.  There's just one major problem; their drive to re-cyrstalize is very hard to overcome. If you dissolve some in boiling water and let it sit, it will turn into rock candy in less than 24 hours. In my baked goods, I prevent this by using plenty of moist, fiber-filled fruits and vegetables (apple sauce, sweet potatoes, bananas) which bond with the sugar alcohols and keep them from linking back up again.  Unfortunately, I didn't see how that would work with granola.  And of course, stevia has that yucky licorice-y aftertaste - not what I wanted at all.

There is a third commonly used sugar alcohol which readily stays in a looser, liquid state; maltitol.  Maltitol has the consistency and appearance of light corn syrup, and has a very neutral flavor.  It is very commonly used in commercial sugar-free products, such as sugar-free chocolates and energy bars, presumably because of its resistance to re-crystalizing.  There is only one problem with maltitol - okay, two.  The first is that, far more than any of the other sugar substitutes, it causes intense flatulence.  I could deal with this by using it very sparingly, but.... the other problem is that it is not readily available to the general public, sold only to food manufacturers.  After googling extensively, I was able to find some retailed on the internet.

By using some stevia along with the malitol, I was able to use the malitol sparingly, helping each sweetener to overcome its issues.  And the results?  This granola was really, really, REALLY good.

*BUT.... UPDATE: JULY, 2014: Since writing this post, I have done further research on maltitol which makes me uncomfortable with using it or promoting it. Many sources now say that maltitol raises blood sugar, and actually has a much higher number of usable carbs in it than the label indicates. Given all this, I will no longer be buying, or using, products with maltitol.

Enter the new darling of the low-carb world: yacon syrup! Yacon is a South American tuber, much like jicama in flavor. When squeezed and cooked down, it creates a thick, dark, tangy syrup which is nutrient-rich, low glycemic, and very good for you. As usual, it's expensive. As usual, it's hard to get. And since Dr. Oz promoted it, a shortage hit. Sigh. Friends at Coracao Confections (organic, raw, low-glycemic, vegan, and fantastic!) referred me to Raw Food World for their syrup. These folks are lovely - great customer service, good products - and I've stocked up. Again, buy using stevia, you can stretch your yacon syrup in the recipe.
The best way to eat it, in my opinion, is with whole milk Greek yoghurt, which is creamy and delicious, and very low in carbs.  The Fage brand has the lowest carbohydrate content of all of the other brands whose labels I've examined, and is super thick, rich and mild-tasting - no sour yoghurt action at all. Trader Joe's also makes a very good whole milk Greek-style yoghurt - and at a great price!  I like to sweeten the yoghurt with some erythritol, and then add a little vanilla for flavor.  Let it sit for a moment to allow the erythritol crystals to dissolve into the yoghurt.  Then sprinkle on the granola....... mmmm.


Sugar-Free, Low Carb Granola with Flax

2 cups quinoa flakes
2 cups rolled oats (not quick cooking oats)

OR: 4 cups rolled oats

1 1/2 cups unsweetened coconut flakes - the big pieces, not the shredded kind
1/2 cup flax seeds
1 cup toasted almonds, preferably slivered
1 cup walnuts, broken into smaller pieces
1 cup pecans, broken into smaller pieces
(or your choice of nuts)
1/4 cup pumpkin seeds
1/4 cup sesame seeds
1/4 cup sunflower seeds
3/4 tsp powdered stevia extract

3 TB flax oil
3 TB coconut oil, or a neutral oil such as canola or sunflower
4 TB yacon syrup or 6 TB maltitol syrup


Pre-heat the oven to 350 F.  Combine all of the grains and nuts in a large bowl.  Sprinkle the stevia powder over the top and toss and stir to combine well.

In an microwave proof cup (such as pyrex) measure all of the oils and the yacon syrup.  Heat them in the microwave until they are hot and have thinned out.

Pour the liquids all over the grain mixture, and stir well to coat all of the contents.  Pour the granola mixture into a roasting or baking pan large enough to hold it all.

When the oven is at temperature, place the pan onto a rack in the center of the oven.  Set the timer for 15-20 minutes. After the timer goes off, stir well to redistribute the contents.  Set the timer for 10-15 minutes, and stir again.  Be careful not to let the contents burn; your goal is golden toasting and drying of all the layers.  Set the timer for 5-10 minutes, and stir again.  If it is golden through and through, remove it from the oven and turn the oven off.  If it is not yet golden, return it to the oven for another 5 minutes or so.  At this point, you can turn the oven off and let the granola toast in the residual heat left in the oven.

Cool in the pan, and then store in an airtight container.  It will keep for several weeks, but is at its tastiest when it is fresh.

Pumpkin Bread (High protein, sugar-free, low-carb)


I grew a nice big crop of butternut squash last year. Unfortunately, the seedlings got such a late start that by the time the squashes were ripe, it was so late in the season that they didn't cure properly before I had to harvest them.  So there I was, mid-winter, looking at all of my beautiful squashes, which were growing a thatch of furry white mold on their crowns. Phooey.  I had to cut off the bad parts and rescue the good parts, but NOW.

Little known fact: most canned "pumpkin" in the store is actually butternut squash.  Another little known fact: there are special eating pumpkins, like Sugar Pie Pumpkin, and then there are jack-o-lantern pumpkins.  Eating pumpkins are sweet and tender. Jack-o-lantern pumpkins are tough and fibrous, not intended for eating at all.

So, anyway.  I cleaned up the squashes, throwing the bad stuff into the compost heap and peeling and chopping the good parts.  I put the cubes of squash into a ceramic bowl, covered them in water, put a plate on top and cooked them in the microwave.  Then I mashed them up well. And now:  it's "Pumpkin" Bread time.

I decided to go for a little more decadence than I normally do in my quick breads; there's melted butter built-in to this luscious bread. Rich, dark, a little spicy with caramel notes; it is excellent for breakfast, or for an afternoon pick-me-up with tea or coffee.  It's wonderful on its own, but toasted, with a little whipped cream cheese smeared on top, or even a little more butter (!)  - heaven!  After I made the first loaf, here's what I wrote on the recipe draft: "Wow! Delicious."

A word about the optional coconut palm sugar; this super low glycemic sugar is the new darling of the low glycemic/diabetic crowd.  Even Dr. Oz did a segment on it on his show, recommending it as a way to lose weight by preventing sugar crashes. It has delectable caramel notes that echo the vanilla in the bread.  The bread is wonderful without it, but if you have a chance to add it, it brings a surprising amount to the party.


Pumpkin Bread

I. 
1 cup pureed pumpkin or butternut squash
1/2 cup melted butter or oil
2 large eggs, lightly beaten
1/2 tsp vanilla
1/4 cup water

II.
1/4 tsp freshly grated nutmeg
1/2 tsp cinnamon
1/4 tsp ground allspice
1/3 cup erythritol
2 TB xylitol
5 tiny scoops stevia extract powder
1 TB coconut palm sugar (optional, but delicious)

III.
3 TB flax meal
3 TB soy protein
3 TB almond meal
3 TB unflavored, unsweetened whey powder
3/4 cups whole wheat pastry flour
1 tsp salt
1 tsp baking soda

IV.
1/2 cups chopped walnuts

1. Preheat the oven to 350 Fahrenheit.  Grease a loaf pan.

2.  In a large bowl, combine all of the wet ingredients from section I and mix well.

3. In a small to medium bowl, combine all of the sweeteners and whisk them to mix well.  Add them to the wet ingredients and stir to combine well.

4.  In a medium bowl (perhaps the one you just used to mix the sweeteners), combine all of the dry ingredients from section III and whisk well to combine.

5.  Stir the dry ingredients into the wet ingredients, mixing just enough to combine well.

6.  Stir in the chopped walnuts.

7.  Pour the batter into the prepared loaf pan, smoothing the surface with a spatula.

8.  Bake for about 1 hour, until a toothpick inserted in the center comes out clean. Let the loaf cool in the pan for about 15 minutes, then tilt out of the pan onto a cooling rack to complete cooling.